文章目录
1.auto
- 关于C++11新特性,最先提到的肯定是类型推导,C++11引入了auto和decltype关键字,使用他们可以在编译期就推导出变量或者表达式的类型,方便开发者编码也简化了代码
auto a = 10; // 10是int型,可以自动推导出a是int
2.左值右值
- 左值:可以取地址并且有名字的东西就是左值。
- 右值:不能取地址的没有名字的东西就是右值。
- 左值引用:对左值进行引用的类型。
- 右值引用:对右值进行引用的类型。
- 移动语义:转移资源所有权,类似于转让或者资源窃取的意思,对于那块资源,转为自己所拥有,别人不再拥有也不会再使用
3.智能指针
std::shared_ptr
std::weak_ptr:不会引起智能指针计数增加。
4.正则表达式
5.STL容器
- std::unordered_map
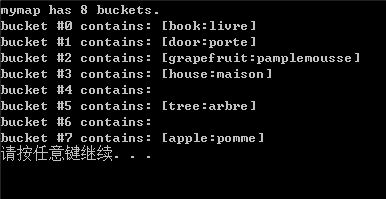
std::unordered_map与std::map用法基本差不多,但STL在内部实现上有很大不同,std::map使用的数据结构为二叉树,而std::unordered_map内部是哈希表的实现方式,哈希map理论上查找效率为O(1)。但在存储效率上,哈希map需要增加哈希表的内存开销。
//webset address: http://www.cplusplus.com/reference/unordered_map/unordered_map/bucket_count/
#include <iostream>
#include <string>
#include <unordered_map>
int main()
{
    std::unordered_map<std::string, std::string> mymap =
    {
        { "house","maison" },
        { "apple","pomme" },
        { "tree","arbre" },
        { "book","livre" },
        { "door","porte" },
        { "grapefruit","pamplemousse" }
    };
    unsigned n = mymap.bucket_count();
    std::cout << "mymap has " << n << " buckets.\n";
    for (unsigned i = 0; i<n; ++i)
    {
        std::cout << "bucket #" << i << " contains: ";
        for (auto it = mymap.begin(i); it != mymap.end(i); ++it)
            std::cout << "[" << it->first << ":" << it->second << "] ";
        std::cout << "\n";
    }
    return 0;
}
结果输出字符串
- std::unordered_set
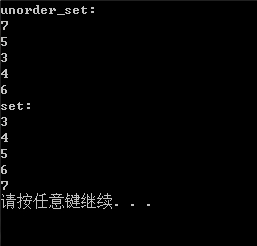
std::unordered_set的数据存储结构也是哈希表的方式结构,除此之外,std::unordered_set在插入时不会自动排序,这都是std::set表现不同的地方
//示例代码1.0 http://www.cnblogs.com/feng-sc/p/5710724.html
#include <iostream>
#include <string>
#include <unordered_set>
#include <set>
int main()
{
    std::unordered_set<int> unorder_set;
    unorder_set.insert(7);
    unorder_set.insert(5);
    unorder_set.insert(3);
    unorder_set.insert(4);
    unorder_set.insert(6);
    std::cout << "unorder_set:" << std::endl;
    for (auto itor : unorder_set)
    {
        std::cout << itor << std::endl;
    }

    std::set<int> set;
    set.insert(7);
    set.insert(5);
    set.insert(3);
    set.insert(4);
    set.insert(6);
    std::cout << "set:" << std::endl;
    for (auto itor : set)
    {
        std::cout << itor << std::endl;
    }
}
结果展示:
6.多线程
6.1 std::thread
std::thread为C++11的线程类,使用方法和boost接口一样,非常方便,同时,C++11的std::thread解决了boost::thread中构成参数限制的问题,我想着都是得益于C++11的可变参数的设计风格
//示例代码1.0 http://www.cnblogs.com/feng-sc/p/5710724.html
#include <thread>
void threadfun1()
{
    std::cout << "threadfun1 - 1\r\n" << std::endl;
    std::this_thread::sleep_for(std::chrono::seconds(1));
    std::cout << "threadfun1 - 2" << std::endl;
}

void threadfun2(int iParam, std::string sParam)
{
    std::cout << "threadfun2 - 1" << std::endl;
    std::this_thread::sleep_for(std::chrono::seconds(5));
    std::cout << "threadfun2 - 2" << std::endl;
}

int main()
{
    std::thread t1(threadfun1);
    std::thread t2(threadfun2, 10, "abc");
    t1.join();
    std::cout << "join" << std::endl;
    t2.detach();
    std::cout << "detach" << std::endl;
}
运行结果:
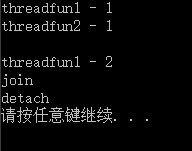
有以上输出结果可以得知,t1.join()会等待t1线程退出后才继续往下执行,t2.detach()并不会并不会把,detach字符输出后,主函数退出,threadfun2还未执行完成,但是在主线程退出后,t2的线程也被已经被强退出。
6.2 std::atomic
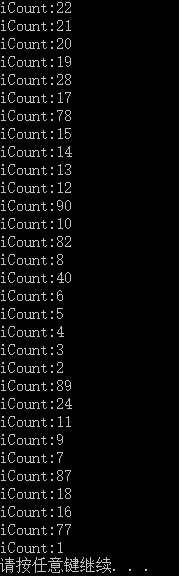
std::atomic为C++11分装的原子数据类型。
//示例代码1.0 http://www.cnblogs.com/feng-sc/p/5710724.html
#include <thread>
#include <atomic>
#include <stdio.h>
std::atomic_bool bIsReady = false;
std::atomic_int iCount = 100;
void threadfun1()
{
    if (!bIsReady) {
        std::this_thread::yield();
    }
    while (iCount > 0)
    {
        printf("iCount:%d\r\n", iCount--);
    }
}

int main()
{
    std::atomic_bool b;
    std::list<std::thread> lstThread;
    for (int i = 0; i < 10; ++i)
    {
        lstThread.push_back(std::thread(threadfun1));
    }
    for (auto& th : lstThread)
    {
        th.join();
    }
}
6.3 std::condition_variable
C++11中的std::condition_variable就像Linux下使用pthread_cond_wait和pthread_cond_signal一样,可以让线程休眠,直到别唤醒,现在在从新执行。线程等待在多线程编程中使用非常频繁,经常需要等待一些异步执行的条件的返回结果。
 1 // webset address: http://www.cplusplus.com/reference/condition_variable/condition_variable/%20condition_variable
 2 // condition_variable example
 3 #include <iostream>           // std::cout
 4 #include <thread>             // std::thread
 5 #include <mutex>              // std::mutex, std::unique_lock
 6 #include <condition_variable> // std::condition_variable
 7
 8 std::mutex mtx;
 9 std::condition_variable cv;
10 bool ready = false;
11
12 void print_id(int id) {
13     std::unique_lock<std::mutex> lck(mtx);
14     while (!ready) cv.wait(lck);
15     // ...
16     std::cout << "thread " << id << '\n';
17 }
18
19 void go() {
20     std::unique_lock<std::mutex> lck(mtx);
21     ready = true;
22     cv.notify_all();
23 }
24
25 int main()
26 {
27     std::thread threads[10];
28     // spawn 10 threads:
29     for (int i = 0; i<10; ++i)
30         threads[i] = std::thread(print_id, i);
31
32     std::cout << "10 threads ready to race...\n";
33     go();                       // go!
34
35     for (auto& th : threads) th.join();
36
37     return 0;
38 }
7.std::function、std::bind封装可执行对象
下面小节主要介绍std::function、std::bind和lamda表达式的一些特点和用法,希望对读者能有所帮助。
7.1 std::function、std::bind封装可执行对象
- 满足以下条件之一就可称为可调用对象:
是一个函数指针
是一个具有operator()成员函数的类对象(传说中的仿函数),lambda表达式
是一个可被转换为函数指针的类对象
是一个类成员(函数)指针
bind表达式或其它函数对象
- 而std::function就是上面这种可调用对象的封装器,可以把std::function看做一个函数对象,用于表示函数这个抽象概念。std::function的实例可以存储、复制和调用任何可调用对象,存储的可调用对象称为std::function的目标,若std::function不含目标,则称它为空,调用空的std::function的目标会抛出std::bad_function_call异常
std::function<void(int)> f; // 这里表示function的对象f的参数是int,返回值是void
#include <functional>
#include <iostream>

struct Foo {
   Foo(int num) : num_(num) {}
   void print_add(int i) const { std::cout << num_ + i << '\n'; }
   int num_;
};

void print_num(int i) { std::cout << i << '\n'; }

struct PrintNum {
   void operator()(int i) const { std::cout << i << '\n'; }
};

int main() {
   // 存储自由函数
   std::function<void(int)> f_display = print_num;
   f_display(-9);


   // 存储 lambda
   std::function<void()> f_display_42 = []() { print_num(42); };
   f_display_42();

   // 存储到 std::bind 调用的结果
   std::function<void()> f_display_31337 = std::bind(print_num, 31337);
   f_display_31337();

   // 存储到成员函数的调用
   std::function<void(const Foo&, int)> f_add_display = &Foo::print_add;
   const Foo foo(314159);
   f_add_display(foo, 1);
   f_add_display(314159, 1);//314159构造函数

   // 存储到数据成员访问器的调用
   std::function<int(Foo const&)> f_num = &Foo::num_;
   std::cout << "num_: " << f_num(foo) << '\n';

   // 存储到成员函数及对象的调用
   using std::placeholders::_1;
   std::function<void(int)> f_add_display2 = std::bind(&Foo::print_add, foo, _1);
   f_add_display2(2);

   // 存储到成员函数和对象指针的调用
   std::function<void(int)> f_add_display3 = std::bind(&Foo::print_add, &foo, _1);
   f_add_display3(3);

   // 存储到函数对象的调用
   std::function<void(int)> f_display_obj = PrintNum();
   f_display_obj(18);
}
- 从上面可以看到std::function的使用方法,当给std::function填入合适的参数表和返回值后,它就变成了可以容纳所有这一类调用方式的函数封装器。std::function还可以用作回调函数,或者在C++里如果需要使用回调那就一定要使用std::function
- std::bind
使用std::bind可以将可调用对象和参数一起绑定,绑定后的结果使用std::function进行保存,并延迟调用到任何我们需要的时候。
- std::bind通常有两大作用:
将可调用对象与参数一起绑定为另一个std::function供调用
将n元可调用对象转成m(m < n)元可调用对象,绑定一部分参数,这里需要使用std::placeholders
#include <functional>
#include <iostream>
#include <memory>

void f(int n1, int n2, int n3, const int& n4, int n5) {
   std::cout << n1 << ' ' << n2 << ' ' << n3 << ' ' << n4 << ' ' << n5 << std::endl;
}

int g(int n1) { return n1; }

struct Foo {
   void print_sum(int n1, int n2) { std::cout << n1 + n2 << std::endl; }
   int data = 10;
};

int main() {
   using namespace std::placeholders;  // 针对 _1, _2, _3...

   // 演示参数重排序和按引用传递
   int n = 7;
   // ( _1 与 _2 来自 std::placeholders ,并表示将来会传递给 f1 的参数)
   auto f1 = std::bind(f, _2, 42, _1, std::cref(n), n);
   n = 10;
   f1(1, 2, 1001);  // 1 为 _1 所绑定, 2 为 _2 所绑定,不使用 1001
                    // 进行到 f(2, 42, 1, n, 7) 的调用

   // 嵌套 bind 子表达式共享占位符
   auto f2 = std::bind(f, _3, std::bind(g, _3), _3, 4, 5);
   f2(10, 11, 12);  // 进行到 f(12, g(12), 12, 4, 5); 的调用

   // 绑定指向成员函数指针
   Foo foo;
   auto f3 = std::bind(&Foo::print_sum, &foo, 95, _1);//foo是传this指针,绑定类对象的成员
   f3(5);

   // 绑定指向数据成员指针
   auto f4 = std::bind(&Foo::data, _1);
   std::cout << f4(foo) << std::endl;

   // 智能指针亦能用于调用被引用对象的成员
   std::cout << f4(std::make_shared<Foo>(foo)) << std::endl;
}