文章目录
智能指针
指针的危害
- 指针未初始化
- 野指针
- 内存泄漏
1. 智能指针 auto_ptr
1.1 auto_ptr的原理
作用:
对作用域内的动态分配对象的自动释放
#include<iostream>
#include <memory>
using namespace std;

class Test{
public:
        Test(){cout << __func__ << endl;}
        ~Test(){cout << __func__ << endl;}
        void Func(int n)const{
                cout << n << endl;
        }
};

int main(){
        // Test* p = new Test;
        auto_ptr<Test> p(new Test);
        p->Func(100);
        // delete pp;
}
编译时显示改用法已经废弃,但执行结果为:
Test
100
~Test
我们自己定义一个智能指针的模板,看看该智能指针做了什么操作
#include<iostream>
#include <memory>
using namespace std;

class Test{
public:
        Test(){cout << __func__ << endl;}
        ~Test(){cout << __func__ << endl;}
        void Func(int n)const{
                cout << n << endl;
        }
};

// 自己定义一个智能指针
namespace MySTL{
        template<typename T>
        class auto_ptr{
                T* p;
        public:
                auto_ptr(T* p):p(p){}      // 构造

                ~auto_ptr(){               // 析构
                        delete p;
                }
                T* operator ->(){          // ->运算符重载
                        return p;
                }
                T& operator *(){           // *运算符重载
                        return *p;
                }
        };
};

int main(){
        MySTL::auto_ptr<Test> p(new Test);
        p->Func(100);
        // 如同 p.operator->()->Func(100);
        (*p).Func(100);
}
结果为:
Test
100
100
~Test
1.2 内存检测工具的使用
安装内存检测工具:
yum -y install valgrind
对于上述例子,如果我们忘记释放指针,即主函数改为:
int main(){
        Test* pp = new Test;
        MySTL::auto_ptr<Test> p(new Test);
        p->Func(100);
        (*p).Func(100);
        // delete pp;
}
那我们就可以看到,有一个内存泄漏
[root@foundation1 C++7.4]# g++ -g smart.cpp
[root@foundation1 C++7.4]# valgrind ./a.out                 使用内存检测工具
// ...... 此处省略
==10758== LEAK SUMMARY:
==10758==    definitely lost: 1 bytes in 1 blocks               // 有一处内存泄漏
==10758==    indirectly lost: 0 bytes in 0 blocks
// ...... 此处省略
[root@foundation1 C++7.4]# valgrind --leak-check=full -v ./a.out      // 查看详细信息
// ...... 此处省略
==10828== 1 bytes in 1 blocks are definitely lost in loss record 1 of 1
==10828==    at 0x4C31556: operator new(unsigned long) (vg_replace_malloc.c:344)
==10828==    by 0x400A3A: main (smart.cpp:35)                  // 表示35行处申请的内存发生泄漏
==10828==
==10828== LEAK SUMMARY:
==10828==    definitely lost: 1 bytes in 1 blocks
// ...... 此处省略
1.3 数组指针的释放
数组内存的申请和释放需要注意写法,我们把主函数改为:
int main(){
        Test* pp = new Test;
        MySTL::auto_ptr<Test> p(new Test);
        p->Func(100);
        (*p).Func(100);
        delete pp;

        int* arr = new int[10];
        delete [] arr;
        // delete arr;      这是不对的,只能释放一个指针
}
结果为:
[root@foundation1 C++7.4]# g++ -g smart.cpp
[root@foundation1 C++7.4]# valgrind --leak-check=full -v ./a.out
// ...... 此处省略
==11117== All heap blocks were freed -- no leaks are possible
==11117==
==11117== ERROR SUMMARY: 0 errors from 0 contexts (suppressed: 0 from 0)       // 没有内存错误
1.4 赋值操作的问题
当赋值的时候,使用智能指针 auto_ptr 就会出现二次释放的问题
把主函数改为:
int main(){
        MySTL::auto_ptr<Test> p(new Test);
        p->Func(100);
        (*p).Func(100);

        MySTL::auto_ptr<Test> p2 = p;         // 赋值操作,会出现问题
        p2->Func(200);
        p->Func(300);
}
显示结果为内存二次释放:
Test
100
100
200
300
~Test
~Test
free(): double free detected in tcache 2
Aborted (core dumped)
所以我们尽量不用智能指针 auto_ptr
2. 智能指针 unique_ptr
作用和 auto_ptr 一样,特点是,不能赋值和赋值
如果我们向上面方式写 unique_ptr
int main(){
        unique_ptr<Test> p(new Test);
        p->Func(100);
        (*p).Func(100);

        unique_ptr<Test> p2 = p;         // 赋值操作,会直接报错
        p2->Func(200);
        p->Func(300);
}
编译时就会报错
3. 智能指针 scoped_ptr
作用与unique_ptr相似,在本作用域中使用,不能复制与赋值。
4. 智能指针 shared_ptr
如果非要赋值,我们可以使用智能指针 shared_ptr ,不会出现二次释放
把上例主函数改为:
int main(){
        shared_ptr<Test> p(new Test);
        p->Func(100);
        (*p).Func(100);

        shared_ptr<Test> p2 = p;         // 赋值操作,会直接报错
        p2->Func(200);
        p->Func(300);
}
就不会报错,能正常运行
4.1 shared_ptr的原理
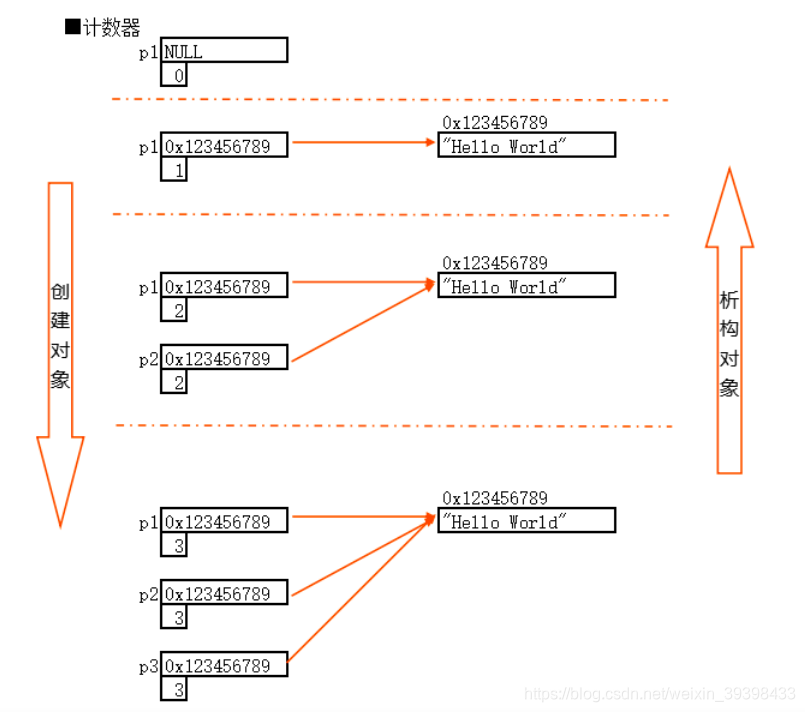
其实是对每一个指针计数,每拷贝一份计数加一,每析构一次计数减一,这就可以避免多次释放
我们自己定义一个智能指针的模板,看看该智能指针做了什么操作
#include<iostream>
#include <memory>
using namespace std;

class Test{
public:
        Test(){cout << __func__ << endl;}
        ~Test(){cout << __func__ << endl;}
        void Func(int n)const{
                cout << n << endl;
        }
};

namespace MySTL{
// 看看shared_ptr是怎么做的
template<typename T>
class shared_ptr{
        struct Record{
                T* p;
                int count;        // 用来计数的
        };
        Record* record;
public:
        // 构造函数
        shared_ptr(T* p){
                record = new Record{p,1};
        }
        // 拷贝构造函数
        shared_ptr(const shared_ptr& ptr){
                record = ptr.record;
                ++record->count;            // 地址个数增加
        }
        // 赋值运算符重载
        shared_ptr& operator = (const shared_ptr& ptr){
                if(this == &ptr) return *this;    // 自己给自己赋值
                if(record->p == ptr.record->p) return *this;
                --record->count;
                if(0 == record->count){
                        delete record->p;
                        delete record;
                }
                record = ptr.record;
                ++record->count;
                return *this;
        }
        // 析构函数
        ~shared_ptr(){
                --record->count;           // 访问地址个数减一
                if(0 == record->count) {
                        delete record->p;    // 要对指针释放
                        delete record;
                }
        }

        T* operator ->(){
                return record->p;
        }
        T& operator *(){
                return *(record->p);
        }
};
};

int main(){
        // Test* pp = new Test;
        MySTL::shared_ptr<Test> p(new Test);
        p->Func(100);
        // delete pp;

        MySTL::shared_ptr<Test> p2 = p;    // 调用拷贝构造
        p2->Func(200);
        p->Func(300);

        MySTL::shared_ptr<Test> p3(new Test);
        p3 = p;                  // 调用赋值运算符重载
        p3->Func(400);
}
结果为:
Test
100
200
300
Test
~Test
400
~Test

4.2 数组指针的释放
数组指针的释放的另一种方法
我们把主函数改为:
加上中括号表示这是数组,需要多次释放
#include<iostream>
#include <memory>
using namespace std;

class Test{
public:
        Test(){cout << __func__ << endl;}
        ~Test(){cout << __func__ << endl;}
        void Func(int n)const{
                cout << n << endl;
        }
};

int main(){
        // unique_ptr<Test> p(new Test[5]);
        unique_ptr<Test[]> p(new Test[5]);
}
结果为:
Test
Test
Test
Test
Test
~Test
~Test
~Test
~Test
~Test
不仅是unique_ptr , shared_ptr 也可以这样用,十分方便
5. 智能指针 weak_ptr
对于循环引用问题
当两个类之间相互定义时,使用 shared_ptr 会有一些问题,在赋值时 a->pb = b; 会不知道析构谁,我们需要使用箬指针 weak_ptr
#include <iostream>
#include <memory>
using namespace std;

class A;
class B;

class A{
public:
        weak_ptr<B> pb;
        A(){cout << __func__ << endl;}
        ~A(){cout << __func__ << endl;}
};

class B{
public:
        weak_ptr<A> pa;
        B(){cout << __func__ << endl;}
        ~B(){cout << __func__ << endl;}
};

int main(){
        shared_ptr<A> a(new A);
        shared_ptr<B> b(new B);    // 各自析构各自的没有问题

        a->pb = b;      // 出现循环引用,不会析构,除非使用weak
        b->pa = a;
}
结果为:
A
B
~B
~A
智能指针weak_ptr主要用来协助shared_ptr
不参与引用计数,但是有以下好处:
- 打破递归的依赖关系
- 使用一个共享的资源但是不要所有权,不添加引用计数
- 避免悬空指针。
写时拷贝技术
用智能指针实现
#include <iostream>
#include <cstring>
#include <memory>
using namespace std;

class String{
        shared_ptr<char[]> ptr;     // 智能指针
public:
        // 构造函数
        String(const char* s){
                char* t = new char[strlen(s)+1];
                strcpy(t,s);
                ptr = shared_ptr<char[]>(t);
        }
        // 析构函数
        ~String(){
                cout << __func__ << endl;
        }
        // 打印信息
        friend ostream& operator << (ostream& os,const String s){
                return os << (void*)s.ptr.get() << ":" << s.ptr.get();   // 访问指针地址和内容
        }

        size_t size()const{
                return strlen(ptr.get());
        }
        String operator+(const String& s)const{
                char* t = new char[size()+s.size()+1];
                strcpy(t,ptr.get());
                strcat(t,s.ptr.get());
                return String(t);
        }
};

int main(){
        String s = "abcd";
        cout << s << endl;

        String t = s;
        t = "def";      // String("def") 隐藏对象
        cout << s << endl;
        cout << t << endl;

        cout << s+t << endl;
}
结果为:
0xf9feb0:abcd
~String
~String
0xf9feb0:abcd
~String
0xfa0300:def
~String
0xfa0360:abcddef
~String
~String
~String