目录
问题1:打开两个参数框,输入一个Tag框,另外一个会一起修改
23.通过循环形式,将获取到的商品静态属性列表渲染成表单item项
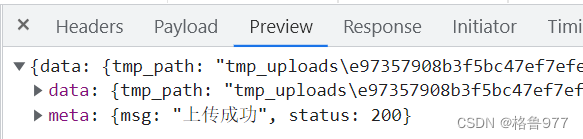
问题:使用network监听网络请求,点击上传按钮选择图片,点击Preview发现,图片并没有真正的上传上去
1.分类参数功能的开发
1.创建分支
- git branch 处于master分支
- git checkout -b goods_params
- git branch 检查处于goods_params分支
- git push -u origin goods_params? 推送到云端
2.参数管理概述
商品参数用于显示商品的固定的特征信息,可以通过电商平台商品详情页值给的看到。
- ?动态参数:用户在选择商品的时候可以选择商品颜色,也可以选择商品版本(用户可以修改)
- 静态属性:商品固定的一些参数(用户只能查看)
3.通过路由将分类参数显示到页面中
import Params from '@/components/goods/Params.vue'
{ path: '/params', component: Params }
vbase一键生成.vue基本框架
4.渲染分类参数基本结构
import { Alert } from 'element-ui'
Vue.use(Alert)closable属性决定是否可关闭,接受boolean,默认为true?- 通过设置
show-icon属性来显示 Alert 的 icon,这能更有效地向用户展示你的显示意图
<div>
  <!-- 面包屑导航区域 -->
  <el-breadcrumb separator-class="el-icon-arrow-right">
    <el-breadcrumb-item :to="{ path: '/home' }"></el-breadcrumb-item>
    <el-breadcrumb-item>商品管理</el-breadcrumb-item>
    <el-breadcrumb-item>参数列表</el-breadcrumb-item>
  </el-breadcrumb>
    <!-- 卡片视图区域 -->
  <el-card>
      <!-- 警告区域 -->
    <el-alert
        title="注意:只允许为第三级分类设置相关参数!"
        type="warning"
        :closable="false"
        show-icon>
    </el-alert>
    <!-- 选择商品分类区域 -->
    <el-row class="cat_opt">
       <el-col >
          <span>选择商品分类:</span>
          <!-- 级联选择框:选择商品分类 -->
       </el-col>
      </el-row>
    </el-card>
  </div>
.cat_opt {
margin: 15px 0;
}https://element.eleme.cn/2.5/#/ji-ben-yong-fa
5.获取商品分类的列表数据
只需要发起get参数,不需要获取任何请求。
data () {
    return {
      // 商品分类列表
      catelist: []
    }
  },
  created () {
    this.getCateList()
  },
  methods: {
    // 获取所有的商品分类列表
    async getCateList () {
      const { data: res } = await this.$http.get('categories')
      if (res.meta.status !== 200) {
        return this.$message.error('获取商品分类失败!')
      }
      this.catelist = res.data
      console.log(this.catelist)
    }
  }
?6.获取商品分类的级联选择框
<!-- 选择商品分类区域 -->
<el-row class="cat_opt">
    <el-col>
       <span>选择商品分类:</span>
       <!-- 级联选择框:选择商品分类 -->
       <el-cascader
            :options="catelist"
            :props="{ expandTrigger: 'hover', ...cateProps }"
            v-model="selectedCateKeys"
            @change="handleChange">
       </el-cascader>
    </el-col>
</el-row>

// 级联选择框的配置对象
cateProps: {
        value: 'cat_id',
        label: 'cat_name',
        children: 'children'
},
// 级联选择框双向绑定到的数组
selectedCateKeys: []

// 级联选择框选中项变化,会触发值给函数
handleChange () {
      console.log(this.selectedCateKeys)
}
https://element.eleme.cn/2.5/#/ji-chu-yong-fa
7.控制其只能选中三级分类
监听选择器的change事件,在change事件中只需要判断选择项的数组长度,如果数组长度不等于3,则不是3级分类,则需要将数组清空,对应选择器中的选择项就会重置。
 // 级联选择框选中项变化,会触发值给函数
    handleChange () {
      // console.log(this.selectedCateKeys)
      // 证明选中的不是三级分类
      if (this.selectedCateKeys.length !== 3) {
        this.selectedCateKeys = []
        return
      }
      // 证明是三级分类
      console.log(this.selectedCateKeys)
    }
?8.渲染动态参数和静态属性的table标签
import { Tabs, TabPane } from 'element-ui'

Vue.use(Tabs)
Vue.use(TabPane)
<!-- tabs页签区域 -->
<el-tabs v-model="activeName" @tab-click="handleTabClick">
<el-tab-pane label="动态参数" name="first">用户管理</el-tab-pane>
<el-tab-pane label="静态属性" name="second">配置管理</el-tab-pane>
</el-tabs>
// 被激活的页签的名称
activeName: 'second'//设置默认显示静态属性
// tab页签点击事件的处理函数
handleTabClick () {
console.log(this.activeName)
}https://element.eleme.cn/2.5/#/ji-chu-yong-fa
9.渲染添加参数,添加属性的按钮(禁用和启用)
禁用:当没有选择三级商品分类的时候,都会处于禁用;启用:当选择了任意一个三级分类,择变成启用状态。(和级联选择器的数组有关系)
<!-- 添加动态参数的面板 -->
<el-tab-pane label="动态参数" name="first">
    <!-- 添加参数的按钮 -->
    <el-button type="primary" size="mini" :disabled="isBtnDisabled">添加参数</el-button>
</el-tab-pane>
<!-- 添加静态属性的面板 -->
<el-tab-pane label="静态属性" name="second">
    <!-- 添加属性的按钮 -->
    <el-button type="primary" size="mini" :disabled="isBtnDisabled">添加属性</el-button>
</el-tab-pane>

//通过定义计算属性,返回布尔值,控制按钮的启用和禁用
computed: {
    // 如果按钮需要被禁用,择返回true;否则返回false
 isBtnDisabled () {
   if (this.selectedCateKeys.length !== 3) {
        return true
   }
      return false
  }
 }
10.获取参数列表数据
-
请求路径:categories/:id/attributes
-
请求方法:get
-
请求参数
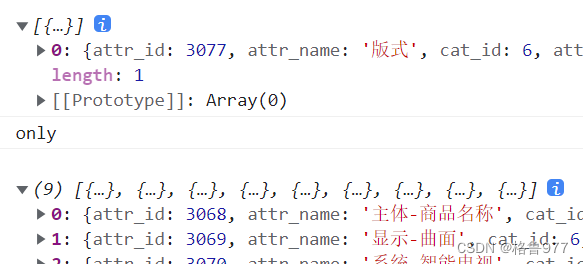
| 参数名 | 参数说明 | 备注 |
|---|---|---|
| :id | 分类 ID | 不能为空携带在url中 |
| sel | [only,many] | 不能为空,通过 only 或 many 来获取分类静态参数还是动态参数 |
-
响应参数
| 参数名 | 参数说明 | 备注 |
|---|---|---|
| attr_id | 分类参数 ID | |
| attr_name | 分类参数名称 | |
| cat_id | 分类参数所属分类 | |
| attr_sel | only:输入框(唯一) many:后台下拉列表/前台单选框 | |
| attr_write | manual:手工录入 list:从列表选择 | |
| attr_vals | 如果 attr_write:list,那么有值,该值以逗号分隔 |
-
响应数据
{
 ?  "data": [
 ? ? ?  {
 ? ? ? ? ?  "attr_id": 1,
 ? ? ? ? ?  "attr_name": "cpu",
 ? ? ? ? ?  "cat_id": 22,
 ? ? ? ? ?  "attr_sel": "only",
 ? ? ? ? ?  "attr_write": "manual",
 ? ? ? ? ?  "attr_vals": "ffff"
 ? ? ?  }
 ?  ],
 ?  "meta": {
 ? ? ?  "msg": "获取成功",
 ? ? ?  "status": 200
 ?  }
}
<!-- 添加动态参数的面板 -->
<el-tab-pane label="动态参数" name="many">
<el-tab-pane label="静态属性" name="only">
// 被激活的页签的名称
activeName: 'many'
computed: {
// 当前选中的三级分类的id
cateId () {
if (this.selectedCateKeys.length === 3) {
// 取数组里面最后一项
return this.selectedCateKeys[2]
}
return null
}
}
methods{
// 级联选择框选中项变化,会触发值给函数
async handleChange () {
// 根据所选分类的Id和当前所处的面板,获取对应参数
const { data: res } = await this.$http.get(`categories/${this.cateId}/attributes`,
{ params: { sel: this.activeName } })
if (res.meta.status !== 200) {
return this.$message.error('获取参数列表失败!')
}
console.log(res.data)
}},
问题1:面板切换了请求没有获取
切换动态参数和静态属性是,没有获取请求,放在handleChange(属于级联选择器,只有级联选择器的选择项发生改变,才会获取对应的数据;而当面板切换到时候,并不能获取对应数据)应该将获取数据的业务逻辑单独放在一个函数中。
 // 级联选择框选中项变化,会触发值给函数
    handleChange () {
      this.getParamsData()
    },
    // tab页签点击事件的处理函数
    handleTabClick () {
      this.getParamsData()
    },
    // 获取参数的列表数据
    async getParamsData () {
      // console.log(this.selectedCateKeys)
      // 证明选中的不是三级分类
      if (this.selectedCateKeys.length !== 3) {
        this.selectedCateKeys = []
        return
      }
      // 证明是三级分类
      console.log(this.selectedCateKeys)
      // 根据所选分类的Id和当前所处的面板,获取对应参数
      const { data: res } = await this.$http.get(`categories/${this.cateId}/attributes`, { params: { sel: this.activeName } })

      if (res.meta.status !== 200) {
        return this.$message.error('获取参数列表失败!')
      }
      console.log(res.data)
    }
?切换面板都会将面板对应的参数获取出来。
面板切换时,都可以获取到对应参数
问题2:获取到的数据是给哪个面板使用
不能直接获取到data上,而是应该进行应该判断;判断这个数据是哪个表格的数据,然后在做对应的处理。两个table可以分别挂载各自的数据源。
// 动态参数的数据
manyTableData: [],
// 静态属性的数据
onlyTableData: []

// 如果是动态表格
if (this.activeName === 'many') {
        this.manyTableData = res.data
} else { // 否则是静态表格
        this.onlyTableData = res.data
}
12.渲染动态参数和静态属性的表格
<!-- 动态参数表格 -->
<el-table :data="manyTableData" border stripe>
     <!-- 展开行 -->
     <el-table-column type="expand"> </el-table-column>
     <!-- 索引列 -->
     <el-table-column type="index"> </el-table-column>
     <el-table-column label="参数名称" prop="attr_name"></el-table-column>
     <el-table-column label="操作">
         <template>
              <el-button type="primary" size="mini" icon="el-icon-edit">编辑</el-button>
              <el-button type="danger" size="mini" icon="el-icon-delete">删除</el-button>
         </template>
     </el-table-column>
</el-table>
<!-- 静态属性表格 -->
<el-table :data="onlyTableData" border stripe>
    其余一样的
</el-table>
13.添加参数和添加属性的功能
两个共用一个对话框。取消添加后,重置对话框里的内容。
 <!-- 添加参数的按钮 -->
<el-button @click="addDialogVisble = true">添加参数</el-button>
<!-- 添加属性的按钮 -->
<el-button @click="addDialogVisble = true">添加属性</el-button>
<!-- 添加参数的对话框 -->
<el-dialog
      :title="'添加' + titleText"
      :visible.sync="addDialogVisble"
      width="50%"
      @close="addDialogClosed"
>
  <!-- 添加参数的对话框 -->
  <el-form
        :model="addForm"
        ref="addFormRef"
        :rules="addFormRlues"
        label-width="100px">
        <!-- 添加参数的对话框 -->
    <el-form-item :label="titleText" prop="attr_name">
       <el-input v-model="addForm.attr_name"></el-input>
    </el-form-item>
  </el-form>
  <span slot="footer">
      <el-button @click="addDialogVisble = false">取消</el-button>
      <el-button type="primary" @click="addDialogVisble">OK</el-button>
  </span>
</el-dialog>

// 控制对话框的显示与隐藏
addDialogVisble: false
// 添加参数的表单数据对象
addForm: {
    attr_name: ''
},
// 添加表单的验证规则对象
addFormRlues: {
    attr_name: [{ required: true, message: '请输入参数名称', trigger: 'blur'}]
}

computed: {
// 动态计算标题的文本
  titleText () {
      if (this.activeName === 'many') {
        return '动态参数'
      }
      return '静态属性'
  }
}
methods: {
 // 监听添加对话框的关闭事件
    addDialogClosed () {
      this.$refs.addFormRef.resetFields()
    }
}
14.参数的添加操作
-
请求路径:categories/:id/attributes
-
请求方法:post
-
请求参数
| 参数名 | 参数说明 | 备注 |
|---|---|---|
| :id | 分类 ID | 不能为空携带在url中 |
| attr_name | 参数名称 | 不能为空 |
| attr_sel | [only,many] | 不能为空 |
| attr_vals | 如果是 many 就需要填写值的选项,以逗号分隔 | 【可选参数】 |
-
响应数据
{
 ?  "data": {
 ? ? ?  "attr_id": 44,
 ? ? ?  "attr_name": "测试参数",
 ? ? ?  "cat_id": "1",
 ? ? ?  "attr_sel": "many",
 ? ? ?  "attr_write": "list",
 ? ? ?  "attr_vals": "a,b,c"
 ?  },
 ?  "meta": {
 ? ? ?  "msg": "创建成功",
 ? ? ?  "status": 201
 ?  }
}
<el-button type="primary" @click="addParams">确认</el-button>
// 点击按钮,添加参数
addParams () {
this.$refs.addFormRef.validate(async valid => {
if (!valid) return
const { data: res } = await this.$http.post(`categories/${this.cateId}/attributes`, {
// 从表单上获取到
attr_name: this.addForm.attr_name,
// 当前激活的是哪个标签页,就把那个名称拿过来
attr_sel: this.activeName
})
if (res.meta.status !== 201) {
return this.$message.error('添加参数失败!')
}
this.$message.success('添加参数传给!')
// 关闭对话框
this.addDialogVisble = false
// 刷新列表
this.getParamsData()
})
}15.点击修改按钮弹出修改对话框
把对应数据加载到表单项中,供用户修改。在点击编辑按钮的时候,将对应参数的id传到处理函数中,根据传递过来的id去查询参数之前的数据。点击确定,完成这次修改操作。
<!-- 动态参数表格 -->
<el-button @click="showEditDialog">编辑</el-button>
<!-- 静态属性表格 -->
<el-button @click="showEditDialog">编辑</el-button>

// 控制修改对话框的显示与隐藏
editDialogVisble: false,
// 修改的表单数据对象
editForm: {},
// 修改表单的验证规则对象
editFormRlues: {
      attr_name: [{
          required: true, message: '请输入参数名称', trigger: 'blur'
      }]
}

// 点击按钮,展示修改的对话框
showEditDialog () {
      this.editDialogVisble = true
},
// 重置修改的表单
editDialogClosed () {
      this.$refs.editFormRef.resetFields()
}
// 点击按钮,修改参数信息
editParams () {

}
根据 ID 查询参数
-
请求路径:categories/:id/attributes/:attrId
-
请求方法:get
-
请求参数
| 参数名 | 参数说明 | 备注 |
|---|---|---|
| :id | 分类 ID | 不能为空携带在url中 |
| :attrId | 属性 ID | 不能为空携带在url中 |
| attr_sel | [only,many] | 不能为空 |
| attr_vals | 如果是 many 就需要填写值的选项,以逗号分隔 |
-
响应数据
{
 ?  "data": {
 ? ? ?  "attr_id": 1,
 ? ? ?  "attr_name": "cpu",
 ? ? ?  "cat_id": 22,
 ? ? ?  "attr_sel": "only",
 ? ? ?  "attr_write": "manual",
 ? ? ?  "attr_vals": "ffff"
 ?  },
 ?  "meta": {
 ? ? ?  "msg": "获取成功",
 ? ? ?  "status": 200
 ?  }
}
<template slot-scope="scope">
<el-button @click="showEditDialog(scope.row.attr_id)">编辑</el-button>
// 点击按钮,展示修改的对话框
async showEditDialog (attrId) {
// 报错:Identifier 'attr_id' is not in camel case.不是驼峰命名法,去掉下划线
// 接收attr_id,查询当前参数的信息
const { data: res } = await this.$http.get(`categories/${this.cateId}/attributes/${attrId}`, { params: { attr_sel: this.activeName } })
if (res.meta.status !== 200) {
return this.$message.error('获取参数信息失败!')
}
// 成功,则把获取到的信息保存到编辑表单对象editForm身上
this.editForm = res.data
this.editDialogVisble = true
},编辑提交参数
-
请求路径:categories/:id/attributes/:attrId
-
请求方法:put
-
请求参数
| 参数名 | 参数说明 | 备注 |
|---|---|---|
| :id | 分类 ID | 不能为空携带在url中 |
| :attrId | 属性 ID | 不能为空携带在url中 |
| attr_name | 新属性的名字 | 不能为空,携带在请求体中 |
| attr_sel | 属性的类型[many或only] | 不能为空,携带在请求体中 |
| attr_vals | 参数的属性值 | 可选参数,携带在请求体中 |
-
响应数据
{
 ?  "data": {
 ? ? ?  "attr_id": 9,
 ? ? ?  "attr_name": "测试更新",
 ? ? ?  "cat_id": "43",
 ? ? ?  "attr_sel": "only",
 ? ? ?  "attr_write": "manual",
 ? ? ?  "attr_vals": "abc"
 ?  },
 ?  "meta": {
 ? ? ?  "msg": "更新成功",
 ? ? ?  "status": 200
 ?  }
}
// 点击按钮,修改参数信息
editParams () {
this.$refs.editFormRef.validate(async valid => {
if (!valid) return
const { data: res } = await this.$http.put(`categories/${this.cateId}/attributes/${this.editForm.attr_id}`, { attr_name: this.editForm.attr_name, attr_sel: this.activeName })
if (res.meta.status !== 200) {
return this.$message.error('修改参数失败!')
}
this.$message.success('修改参数成功!')
// 刷新数据列表
this.getParamsData()
// 隐藏对话框
this.editDialogVisble = false
})
}16.删除按钮的操作
点击按钮的时候,会触发一个点击事件,点击事件中指定处理函数,并且把对应的参数id传进去,调用API,执行删除请求。
<el-button @click="removeParams(scope.row.attr_id)">删除</el-button>调用
$confirm方法即可打开消息提示,它模拟了系统的?confirm。type字段表明消息类型,可以为success,error,info和warning,无效的设置将会被忽略。
https://element.eleme.cn/2.5/#/xiao-xi-ti-shi
删除参数
-
请求路径: categories/:id/attributes/:attrid
-
请求方法:delete
-
请求参数
| 参数名 | 参数说明 | 备注 |
|---|---|---|
| :id | 分类 ID | 不能为空携带在url中 |
| :attrid | 参数 ID | 不能为空携带在url中 |
-
响应数据
{
 ?  "data": null,
 ?  "meta": {
 ? ? ?  "msg": "删除成功",
 ? ? ?  "status": 200
 ?  }
}
// / 根据Id删除对应的参数项
async removeParams (attrId) {
// 因为它返回的是一个文本,不需要解构
const confirmResult = await this.$confirm('此操作将永久删除该参数, 是否继续?', '提示', {
confirmButtonText: '确定',
cancelButtonText: '取消',
type: 'warning'
}).catch(err => err)
// 用户取消了删除的操作
if (confirmResult !== 'confirm') {
return this.$message.info('已取消删除!')
}
// 删除的业务逻辑。调用API
const { data: res } = await this.$http.delete(`categories/${this.cateId}/attributes/${attrId}`)
if (res.meta.status !== 200) {
return this.$message.error('删除参数失败!')
}
this.$message.success('删除参数成功!')
// 刷新数据列表
this.getParamsData()
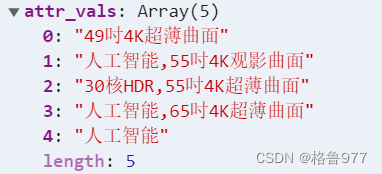
}17.渲染参数下的可选项并新增New Tag
attr_vals用空格做分割,得到数组,进行for循环。?
![]()
// 获取参数的列表数据
async getParamsData () {
// 在赋值之前,把里面都每一项都做一次循环
  res.data.forEach(item => {
      item.attr_vals = item.attr_vals.split(' ')
  })
  console.log(res.data)
}
?得到数组形式
?
?接下来,循环显示出数组的内容
<!-- 动态参数表格 -->
<el-table :data="manyTableData" border stripe>
  <!-- 展开行 -->
  <el-table-column type="expand">
      <template slot-scope="scope">
       <el-tag v-for="(item, i) in scope.row.attr_vals" :key="i" closable>
         {{item}}</el-tag>
      </template>
  </el-table-column>
.el-tag {
margin: 10px;
}?将每一参数里面的attr_vals从字符串分割成一个数组,分割完毕之后,又将这个数组在展开行中通过for循环的形式,渲染为每一个tag标签。
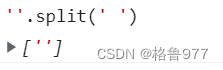
问题:新添加的参数,会有一个空白的tag标签
空字符串分割出来,会显示空格
?
 res.data.forEach(item => {
    // 要先判断一下item.attr_vals是否为空
        item.attr_vals = item.attr_vals ? item.attr_vals.split(' ') : []
})
console.log(res.data)
18.控制添加按钮与输入文本框的切换显示
点击按钮,文本框就显示,隐藏new tag;文本框失去焦点的时候,显示new tag,隐藏文本框。
 <!-- 输入的文本框 -->
<el-input class="input-new-tag" v-if="inputVisible" v-model="inputValue"
 ref="saveTagInput" size="small" @keyup.enter.native="handleInputConfirm"
 @blur="handleInputConfirm">
</el-input>
<!-- 添加按钮 -->
<el-button class="button-new-tag" v-else size="small" @click="showInput">+ New Tag</el-button>

// 控制按钮与文本框的切换显示
inputVisible: false,
// 文本框中输入的内容
inputValue: ''

// 文本框失去焦点或者摁下了enter,都会触发
handleInputConfirm () {
    console.log('ok')
},
// 点击按钮,展示文本输入框
showInput () {
    this.inputVisible = true
}

.input-new-tag {
  width: 120px;
}
https://element.eleme.cn/2.5/#/dong-tai-bian-ji-biao-qian
问题1:打开两个参数框,输入一个Tag框,另外一个会一起修改
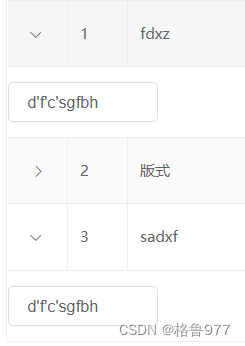
?每次渲染出一个展开行,它们都共用了这个布尔值inputVisible和Value值inputValue,解决:给每一个数据单独的?v-if="inputVisible"?和?v-model="inputValue"。
 <el-input class="input-new-tag"
      v-if="scope.row.inputVisible"
      v-model="scope.row.inputValue"
 <!-- 添加按钮 -->
<el-button class="button-new-tag" size="small"
      @click="showInput(scope.row)"
               >+ New Tag</el-button>

//有问题不需要这两个数据
// 控制按钮与文本框的切换显示
      // inputVisible: false,
      // 文本框中输入的内容
      // inputValue: ''

async getParamsData () {
// 在赋值之前,把里面都每一项都做一次循环
   res.data.forEach(item => {
        // 要先判断一下item.attr_vals是否为空
        item.attr_vals = item.attr_vals ? item.attr_vals.split(' ') : []
        // this.$set(item, 'inputVisible', false)
        // 控制文本框的显示与隐藏
        item.inputVisible = false
        // 文本框中输入的值
        // this.$set(item, 'inputValue', '')
        item.inputValue = ''
   })
}

// 点击按钮,展示文本输入框
showInput (row) {
      row.inputVisible = true
}
问题2:需要自动获得焦点
点击按钮时,会显示文本输入框,但是不会自动获得焦点,需要直接添加。
Element ui代码片段?
 showInput() {
   this.inputVisible = true;
   this.$nextTick(_ => {
      this.$refs.saveTagInput.$refs.input.focus();
   });
},
el本身时作为渲染元素来动态渲染的,ref时作为渲染结果被创建的,在渲染初期该元素还不存在。
第一个refs是拿到组件saveTagInput,第二个refs:该组件中通过refs拿到HTML元素input,input自带focus方法。
    // 点击按钮,展示文本输入框
    showInput (row) {
      row.inputVisible = true
      // 让文本框自动获得焦点
// nextTick方法作用:当页面上元素被重新渲染之后,才会指定回调函数中的代码
      this.$nextTick(_ => {
        this.$refs.saveTagInput.$refs.input.focus()
      })
    }
19.按钮与文本框的切换形式
 <!-- 输入的文本框 -->
<el-input @keyup.enter.native="handleInputConfirm(scope.row)"
          @blur="handleInputConfirm(scope.row)">

// 文本框失去焦点或者摁下了enter,都会触发
handleInputConfirm (row) {
  row.inputVisible = false
},
优化:空格再失去焦点时应该清空
 // 文本框失去焦点或者摁下了enter,都会触发
    handleInputConfirm (row) {
      // console.log('ok')
      // 如果输入的是空的
      if (row.inputValue.trim().length === 0) {
        // 将值重置为空
        row.inputValue = ''
        // 将文本框隐藏
        row.inputVisible = false
        return
      }
      // 如果没有return,则证明输入的内容,需要做后续处理
    },
20.参数项的添加操作
点击展开行,输入内容,点击回车或失去焦点即可添加new tag。
// 文本框失去焦点或者摁下了enter,都会触发
handleInputConfirm (row) {
   // console.log('ok')
   // 如果输入的是空的
   if (row.inputValue.trim().length === 0) {
     // 将值重置为空
     row.inputValue = ''
     // 将文本框隐藏
     row.inputVisible = false
//一定要return出去
     return
   }
   // 如果没有return,则证明输入的内容,需要做后续处理
   row.attr_vals.push(row.inputValue.trim())
   // 重置为空字符串
   row.inputValue = ''
   // 隐藏
   row.inputVisible = false
},
编辑提交参数API
-
请求路径:categories/:id/attributes/:attrId
-
请求方法:put
-
请求参数
| 参数名 | 参数说明 | 备注 |
|---|---|---|
| :id | 分类 ID | 不能为空携带在url中 |
| :attrId | 属性 ID | 不能为空携带在url中 |
| attr_name | 新属性的名字 | 不能为空,携带在请求体中 |
| attr_sel | 属性的类型[many或only] | 不能为空,携带在请求体中 |
| attr_vals | 参数的属性值 | 可选参数,携带在请求体中 |
-
响应数据
{
 ?  "data": {
 ? ? ?  "attr_id": 9,
 ? ? ?  "attr_name": "测试更新",
 ? ? ?  "cat_id": "43",
 ? ? ?  "attr_sel": "only",
 ? ? ?  "attr_write": "manual",
 ? ? ?  "attr_vals": "abc"
 ?  },
 ?  "meta": {
 ? ? ?  "msg": "更新成功",
 ? ? ?  "status": 200
 ?  }
}
// 文本框失去焦点或者摁下了enter,都会触发
async handleInputConfirm (row) {
// 如果输入的是空的
if (row.inputValue.trim().length === 0) {
// 将值重置为空
row.inputValue = ''
// 将文本框隐藏
row.inputVisible = false
//如果不return,会出现提交两次的情况
return
}
// 如果没有return,则证明输入的内容,需要做后续处理
row.attr_vals.push(row.inputValue.trim())
// 重置为空字符串
row.inputValue = ''
// 隐藏
row.inputVisible = false
// 这个接口是把当前attr_vals的值传过去,并不会把你添加的内容加入到vals中,需要push一下
// 直接请求接口用户也看不到数据,需要刷新页面影响体验,所以先组件手动push一个伪添加,让用户看见
// 发起请求,保存这次操作
const { data: res } = await this.$http.put(`categories/${this.cateId}/attributes/${row.attr_id}`, { attr_name: row.attr_name, attr_sel: row.attr_sel, attr_vals: row.attr_vals.join(' ') })
// attr_vals是刚才拼接出来的新数组
if (res.meta.status !== 200) {
return this.$message.error('修改参数项失败!')
}
this.$message.success('修改参数项成功!')
},监听文本输入框添加焦点的事件;调用处理函数;在处理函数中,没有return出去,则需要添加这次操作(将用户输入的值添加到attr_vals中,将文本框的值立即清空inputValue,同时隐藏文本框;然后发起put请求,将需要的参数提交到服务器)
21.删除tag标签操作
<!-- 循环渲染Tag标签 -->
<el-tag
       v-for="(item, i) in scope.row.attr_vals"
       :key="i"
       closable
       @close="handleClose(i,scope.row)"
       >{{ item }}</el-tag>

 // 文本框失去焦点或者摁下了enter,都会触发
handleInputConfirm (row) {
    // 需要发起请求,保存这次操作
    this.saveAttrVals(row)
},
// 删除对应的参数可选项
handleClose (i, row) {
    // splice删除一项即可
    row.attr_vals.splice(i, 1)
    // 调用接口
    this.saveAttrVals(row)
}
抽离上述接口出来(此接口可以复用)
// 将对attr_vals的操作,保存到数据库
async saveAttrVals (row) {
 // 这个接口是把当前attr_vals的值传过去,并不会把你添加的内容加入到vals中,需要push一下
 // 直接请求接口用户也看不到数据,需要刷新页面影响体验,所以先组件手动push一个伪添加,让用户看见
 // 发起请求,保存这次操作
  const { data: res } = await this.$http.put(`categories/${this.cateId}/attributes/${row.attr_id}`,
      {
          attr_name: row.attr_name,
          attr_sel: row.attr_sel,
          attr_vals: row.attr_vals.join(' ')
      }
   )
// attr_vals是刚才拼接出来的新数组
  if (res.meta.status !== 200) {
        return this.$message.error('修改参数项失败!')
  }
  this.$message.success('修改参数项成功!')
},
问题:选中的不是三级分类,就应该立即将表格数据清空?
只要选择项发生变化就会引起change事件handleChange,在handleChange中的getParamsData做处理。
async getParamsData () {
  // console.log(this.selectedCateKeys)
  // 证明选中的不是三级分类
  if (this.selectedCateKeys.length !== 3) {
        // 分类的Keys数组清空重置
        this.selectedCateKeys = []
        this.manyTableData = []
        this.onlyTableData = []
        return
  }
当商品分类被强制清空时(不是三级分类时),把动态参数和静态属性清空重置。
22. 静态属性展开行效果复制
<!-- 展开行 -->
<el-table-column type="expand">
    <template slot-scope="scope">
        <!-- 循环渲染Tag标签 -->
        <el-tag v-for="(item, i) in scope.row.attr_vals" :key="i" closable
            @close="handleClose(i, scope.row)">{{ item }}</el-tag>
        <!-- 输入的文本框 -->
        <el-input class="input-new-tag" v-if="scope.row.inputVisible"
            v-model="scope.row.inputValue" ref="saveTagInput" size="small"
            @keyup.enter.native="handleInputConfirm(scope.row)"
            @blur="handleInputConfirm(scope.row)">
        </el-input>
        <!-- 添加按钮 -->
        <el-button v-else class="button-new-tag" size="small"
            @click="showInput(scope.row)">+ New Tag</el-button>
    </template>
</el-table-column>
23.分类参数的代码,提交到gitee
- git branch
- git status
- git add .
- git status
- git commit -m "完成了分类参数的开发"
- git status
- git push
- git checkout master
- git branch
- git merge goods_params
- git push
2.商品列表功能开发
1.创建新的子分支
- git branch?
- git checkout -b goods_list
- git branch
- git push -u origin goods_list
2.路由形式将商品列表组件加载出来
import GoodsList from '@/components/goods/List.vue'

{ path: '/goods', component: GoodsList }
基本结构
<!-- 面包屑导航区域 -->
<el-breadcrumb separator-class="el-icon-arrow-right">
   <el-breadcrumb-item :to="{ path: '/home' }">首页</el-breadcrumb-item>
   <el-breadcrumb-item>商品管理</el-breadcrumb-item>
   <el-breadcrumb-item>商品列表</el-breadcrumb-item>
</el-breadcrumb>
<!-- 卡片视图区域 -->
<el-card>
   <el-row :gutter="20">
        <el-col :span="8">
          <!-- 带有搜索按钮的input文本输入框 -->
          <el-input placeholder="请输入内容">
            <el-button slot="append" icon="el-icon-search"></el-button>
          </el-input>
        </el-col>
        <el-col :span="4">
          <el-button type="primary">添加商品</el-button>
        </el-col>
   </el-row>
</el-card>
https://element.eleme.cn/2.5/#/fu-he-xing-shu-ru-kuang
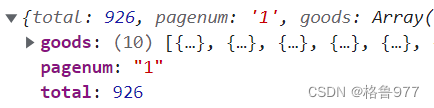
3.获取商品列表数据
此商品列表有分页的功能。
商品列表数据
-
请求路径:goods
-
请求方法:get
-
请求参数
| 参数名 | 参数说明 | 备注 |
|---|---|---|
| query | 查询参数 | 可以为空 |
| pagenum | 当前页码 | 不能为空 |
| pagesize | 每页显示条数 | 不能为空 |
-
响应参数
| 参数名 | 参数说明 | 备注 |
|---|---|---|
| total | 总共商品条数 | |
| pagenum | 当前商品页数 | |
| goods_id | 商品 ID | |
| goods_name | 商品名称 | |
| goods_price | 价格 | |
| goods_number | 数量 | |
| goods_weight | 重量 | 不能为空 |
| goods_state | 商品状态 | 商品状态 0: 未通过 1: 审核中 2: 已审核 |
| add_time | 添加时间 | |
| upd_time | 更新时间 | |
| hot_mumber | 热销品数量 | |
| is_promote | 是否是热销品 |
-
响应数据
{"data": {
 ? ? ?  "total": 50,
 ? ? ?  "pagenum": "1",
 ? ? ?  "goods": [{
 ? ? ? ? ? ? ?  "goods_id": 144,
 ? ? ? ? ? ? ?  "goods_name": "asfdsd",
 ? ? ? ? ? ? ?  "goods_price": 1,
 ? ? ? ? ? ? ?  "goods_number": 1,
 ? ? ? ? ? ? ?  "goods_weight": 1,
 ? ? ? ? ? ? ?  "goods_state": null,
 ? ? ? ? ? ? ?  "add_time": 1512954923,
 ? ? ? ? ? ? ?  "upd_time": 1512954923,
 ? ? ? ? ? ? ?  "hot_mumber": 0,
 ? ? ? ? ? ? ?  "is_promote": false
 ? ? ? ? ?  }]},
 ?  "meta": {
 ? ? ?  "msg": "获取成功",
 ? ? ?  "status": 200
? }}- 获取所有商品列表,定义这个事件处理函数
- 定义queryInfo查询参数对象
- 处理getGoodsList函数,如果这个接口调用成功,会返回一个promise对象,可以使用async和await来简化这次异步操作,通过解构赋值,从返回的对象上解构出data属性,并且重命名为res
- 在data里定义两个数据,goodslist和total
- 当数据获取成功,为goodslist和total赋值
- 将获取到的数据渲染到页面上
 data () {
    return {
      // 查询参数对象
      queryInfo: {
        query: '',
        pagenum: 1,
        pagesize: 10
      },
      // 商品列表
      goodslist: [],
      // 总数据条数
      total: 0
    }
  },
  created () {
    this.getGoodsList()
  },
  methods: {
    // 根据分页获取对应的商品列表
    async getGoodsList () {
      const { data: res } = await this.$http.get('goods', { params: this.queryInfo })

      if (res.meta.status !== 200) {
        return this.$message.error('获取商品列表失败!')
      }
      this.$message.success('获取商品列表成功!')
      console.log(res.data)
      this.goodslist = res.data.goods
      this.total = res.data.total
    }
  }
<!-- table表格区域 -->
<el-table :data="goodslist" border stripe>
   <el-table-column type="index"></el-table-column>
   <el-table-column label="商品名称" prop="goods_name"></el-table-column>
   <el-table-column label="商品价格(元)" prop="goods_price" width="95px"></el-table-
   column>
   <el-table-column label="商品重量" prop="goods_weight" width="70px"></el-table-
   column>
   <el-table-column label="创建时间" prop="add_time" width="140px"></el-table-column>
   <el-table-column label="操作" width="130px">
      <!-- 带图标的button按钮 -->
        <template>
           <el-button type="primary" icon="el-icon-edit" size="mini"></el-button>
           <el-button type="danger" icon="el-icon-delete" size="mini"></el-button>
        </template>
   </el-table-column>
</el-table>
https://element.eleme.cn/2.5/#/tu-biao-an-niu
4.创建全局时间过滤器
处理时间格式问题。
// 定义全局过滤器
Vue.filter('dateFormat', function (originVal) {
  const dt = new Date(originVal)
  const y = dt.getFullYear()
  // 月份如果不足两位,在前面补个0:先让它变成字符串,再使用padStart,第一个数是总长度,第二个数是字符串(不足两位时,用此字符串填充,即0),
  const m = (dt.getMonth() + 1 + '').padStart(2, '0')
  const d = (dt.getDate() + '').padStart(2, '0')
  const hh = (dt.getHours() + '').padStart(2, '0')
  const mm = (dt.getMinutes() + '').padStart(2, '0')
  const ss = (dt.getSeconds() + '').padStart(2, '0')
  // return `yyyy-mm-dd hh:mm:ss`
  return `${y}-${m}-${d} ${hh}:${mm}:${ss}`
})
将时间那一列做自定义渲染
改为作用域插槽形式,slot-scope接收插槽里面的数据,将它进行时间的过滤。
<el-table-column label="创建时间" prop="add_time" width="140px">
  <template slot-scope="scope">
        {{scope.row.add_time | dateFormat}}
  </template>
</el-table-column>
5.商品列表底部的分页功能
使用功能最全的分页功能。
| page-size | 每页显示条目个数,支持 .sync 修饰符 | number | ― | 10 |
| total | 总条目数 | number | ― | ― |
| current-page | 当前页数,支持 .sync 修饰符 | number | ― | 1 |
| size-change | pageSize 改变时会触发 | 每页条数 |
| current-change | currentPage 改变时会触发 | 当前页 |
<!-- 分页区域 -->
<el-pagination
        @size-change="handleSizeChange"
        @current-change="handleCurrentChange"
        :current-page="queryInfo.pagenum"
        :page-sizes="[5, 10, 15, 20]"
        :page-size="queryInfo.pagesize"
        layout="total, sizes, prev, pager, next, jumper"
        :total="total"
        background
>
</el-pagination>

// pagesize发生变化
handleSizeChange (newSize) {
      // 赋值
      this.queryInfo.pagesize = newSize
      // 赋值后,应该重新获取
      this.getGoodsList()
},
// pagenum发生变化
handleCurrentChange (newPage) {
      this.queryInfo.pagenum = newPage
      this.getGoodsList()
}
https://element.eleme.cn/2.5/#/fu-jia-gong-neng
6.搜索与清空的功能
搜索
- 将文本框里的数据与查询里的query做数据绑定v-model="queryInfo.query"
- 点击搜索按钮,调用获取数据列表的函数getGoodsList
<!-- 带有搜索按钮的input文本输入框 -->
<el-input  v-model="queryInfo.query">
   <el-button @click="getGoodsList"></el-button>
</el-input>
清空
- 给input添加clearable属性
- 点击×,会触发clear事件,调用getGoodsList重新获取所有数据
<!-- 带有搜索按钮的input文本输入框 -->
<el-input clearable @clear="getGoodsList">
7.完成删除商品的功能
<template slot-scope="scope">
  <el-button type="danger" icon="el-icon-delete"
    @click="removeById(scope.row.goods_id)">
  </el-button>

// 删除商品
async removeById (id) {
      const confirmResult = await this.$confirm('此操作将永久删除该商品, 是否继续?', '提示', {
        confirmButtonText: '确定',
        cancelButtonText: '取消',
        type: 'warning'
      }).catch(err => err)
      if (confirmResult !== 'confirm') {
        return this.$message.info('已经取消删除!')
      }
      const { data: res } = await this.$http.delete(`goods/${id}`)
      if (res.meta.status !== 200) {
        return this.$message.error('删除失败!')
      }
      this.$message.success('删除成功!')
      // 刷新数据列表
      this.getGoodsList()
}
删除商品
-
请求路径:goods/:id
-
请求方法:delete
-
请求参数
| 参数名 | 参数说明 | 备注 |
|---|---|---|
| id | 商品 ID | 不能为空携带在url中 |
-
响应数据
{
 ?  "data": null,
 ?  "meta": {
 ? ? ?  "msg": "删除成功",
 ? ? ?  "status": 200
 ?  }
}
https://element.eleme.cn/2.5/#/que-ren-xiao-xi
8.实现点击添加商品按钮
点击添加商品按钮后,跳转到添加商品信息页面。
List.vue?
<el-button type="primary" @click="goAddpage">添加商品</el-button>
goAddpage () {
      // 点击添加按钮跳转到指定页面add
      this.$router.push('goods/add')
}
router/index.js?
import Add from '@/components/goods/Add.vue'

{ path: '/goods/add', component: Add }
9.绘制添加页面的基本结构
import { Step, Steps } from 'element-ui'
Vue.use(Step)
Vue.use(Steps)
<!-- 面包屑导航区域 -->
<el-breadcrumb separator-class="el-icon-arrow-right">
<el-breadcrumb-item :to="{ path: '/home' }"></el-breadcrumb-item>
<el-breadcrumb-item>商品管理</el-breadcrumb-item>
<el-breadcrumb-item>添加商品</el-breadcrumb-item>
</el-breadcrumb>
<!-- 卡片视图 -->
<el-card>
<!-- 提示区域 -->
<el-alert
title="添加商品信息"
type="info"
center
show-icon
:closable="false"></el-alert>
<!-- 步骤条区域 -->
<el-steps
:space="200"
:active="activeIndex"
finish-status="success"
align-center>
<el-step title="基本信息"></el-step>
<el-step title="商品参数"></el-step>
<el-step title="商品属性"></el-step>
<el-step title="商品图片"></el-step>
<el-step title="商品内容"></el-step>
<el-step title="完成"></el-step>
</el-steps>
</el-card>
data () {
return {
// 默认激活0的高亮
activeIndex: 0
}
},https://element.eleme.cn/2.5/#/wen-zi-ju-zhong
https://element.eleme.cn/2.5/#/han-zhuang-tai-bu-zou-tiao
global.css
.el-steps {
  margin: 15px;
}
.el-step__title {
  font-size: 13px;
}
10.绘制table栏区域
需要使用Tabs标签页。
<!-- tabs栏区域 -->
<el-tabs :tab-position="'left'" style="height: 200px">
        <el-tab-pane label="基本信息">基本信息</el-tab-pane>
        <el-tab-pane label="商品参数">商品参数</el-tab-pane>
        <el-tab-pane label="商品属性">商品属性</el-tab-pane>
        <el-tab-pane label="商品图片">商品图片</el-tab-pane>
        <el-tab-pane label="商品内容">商品内容</el-tab-pane>
</el-tabs>
https://element.eleme.cn/2.5/#/wei-zhi
11.步骤条和Tabs栏的数据联动效果
| value / v-model | 绑定值,选中选项卡的 name | string | ― | 第一个选项卡的 name |
| name | 与选项卡 activeName 对应的标识符,表示选项卡别名 | string | ― | 该选项卡在选项卡列表中的顺序值,如第一个选项卡则为'1' |
<!-- 步骤条区域 -->
<!--  - 0:转换成数值类型;+ 0 :字符串的拼接 -->
<el-steps :active="activeIndex - 0"></el-steps>
      <!-- tabs栏区域 -->
      <el-tabs v-model="activeIndex">
        <el-tab-pane label="基本信息" name="1">基本信息</el-tab-pane>
        <el-tab-pane label="商品参数" name="2">商品参数</el-tab-pane>
        <el-tab-pane label="商品属性" name="3">商品属性</el-tab-pane>
        <el-tab-pane label="商品图片" name="4">商品图片</el-tab-pane>
        <el-tab-pane label="商品内容" name="5">商品内容</el-tab-pane>
      </el-tabs>

data () {
    return {
      // 默认激活0的高亮
      activeIndex: '0'
    }
},
12.完整的面板数据
每个面板只维护各自的数据,是部分数据,需要把所有面板合起来来实完整的数据。把五个panel面板外面用统一form表单包裹。使用带有验证规则的form表单。
| label-position | 表单域标签的位置,如果值为 left 或者 right 时,则需要设置?label-width | string | right/left/top | right |
<el-form
        :model="addForm"
        :rules="addFormRules"
        ref="addFormRef"
        label-width="100px"
        label-position="top">
<!-- tabs栏区域 -->

 // 添加商品的表单数据对象
      addForm: {},
      addFormRules: {}
https://element.eleme.cn/2.5/#/biao-dan-yan-zheng
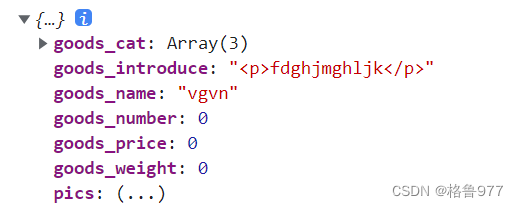
13.基本信息的表单item项
添加商品
-
请求路径:goods
-
请求方法:post
-
请求参数
| 参数名 | 参数说明 | 备注 |
|---|---|---|
| goods_name | 商品名称 | 不能为空 |
| goods_cat | 以为','分割的分类列表 | 不能为空 |
| goods_price | 价格 | 不能为空 |
| goods_number | 数量 | 不能为空 |
| goods_weight | 重量 | 不能为空 |
| goods_introduce | 介绍 | 可以为空 |
| pics | 上传的图片临时路径(对象) | 可以为空 |
| attrs | 商品的参数(数组),包含 动态参数 和 静态属性 | 可以为空 |
-
请求数据
{
 ?"goods_name":"test_goods_name2",
 ?"goods_cat": "1,2,3",
 ?"goods_price":20,
 ?"goods_number":30,
 ?"goods_weight":40,
 ?"goods_introduce":"abc",
 ?"pics":[
 ?  {"pic":"/tmp_uploads/30f08d52c551ecb447277eae232304b8"}
 ?  ],
 ?"attrs":[
 ?  {
 ? ? ?"attr_id":15,
 ? ? ?"attr_value":"ddd"
 ?  },
 ?  {
 ? ? ?"attr_id":15,
 ? ? ?"attr_value":"eee"
 ?  }]}
<!-- tabs栏区域 -->
<el-tabs :tab-position="'left'" v-model="activeIndex">
<el-tab-pane label="基本信息" name="0">
<el-form-item label="商品名称" prop="goods_name">
<el-input v-model="addForm.goods_name"></el-input>
</el-form-item>
<el-form-item label="商品价格" prop="goods_price">
<el-input v-model="addForm.goods_price" type="number"></el-input>
</el-form-item>
<el-form-item label="商品重量" prop="goods_weight">
<el-input v-model="addForm.goods_weight" type="number"></el-input>
</el-form-item>
<el-form-item label="商品数量" prop="goods_number">
<el-input v-model="addForm.goods_number" type="number"></el-input>
</el-form-item>
</el-tab-pane>
addForm: {
goods_name: '',
goods_price: 0,
goods_weight: 0,
goods_number: 0
},
addFormRules: {
goods_name: [
{ required: true, message: '请输入商品名称', trigger: 'blur' }
],
goods_price: [
{ required: true, message: '请输入商品价格', trigger: 'blur' }
],
goods_weight: [
{ required: true, message: '请输入商品重量', trigger: 'blur' }
],
goods_number: [
{ required: true, message: '请输入商品数量', trigger: 'blur' }
]
}15.获取商品的分类数据
不需要分页,把所有数据获取过来即可,一级二级三级分类都要获取。
// 商品分类列表
catelist: []
created () {
this.getCateList()
},
// 获取所有商品分类数据
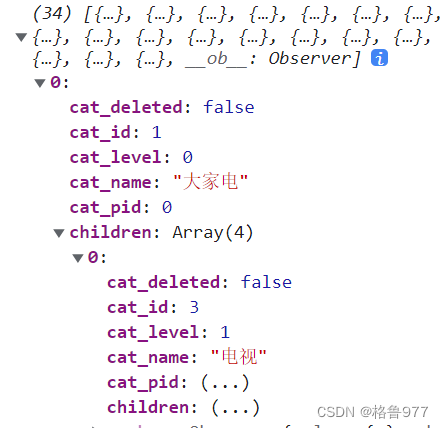
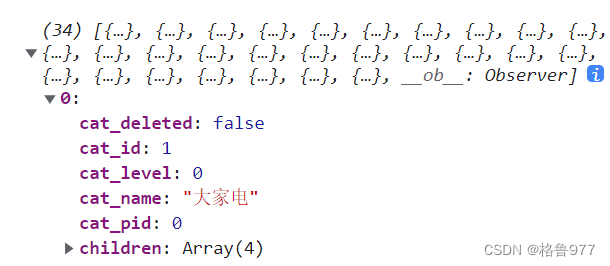
async getCateList () {
const { data: res } = await this.$http.get('categories')
if (res.meta.status !== 200) {
return this.$message.error('获取商品分类数据失败!')
}
this.catelist = res.data
console.log(this.catelist)
}
16.根据获取到的数据渲染级联选择器
添加商品
-
请求路径:goods
-
请求方法:post
-
请求参数
| 参数名 | 参数说明 | 备注 |
|---|---|---|
| goods_name | 商品名称 | 不能为空 |
| goods_cat | 以为','分割的分类列表 | 不能为空 |
| goods_price | 价格 | 不能为空 |
| goods_number | 数量 | 不能为空 |
| goods_weight | 重量 | 不能为空 |
| goods_introduce | 介绍 | 可以为空 |
| pics | 上传的图片临时路径(对象) | 可以为空 |
| attrs | 商品的参数(数组),包含 动态参数 和 静态属性 | 可以为空 |
-
请求数据
{
 ?"goods_name":"test_goods_name2",
 ?"goods_cat": "1,2,3",
 ?"goods_price":20,
 ?"goods_number":30,
 ?"goods_weight":40,
 ?"goods_introduce":"abc",
 ?"pics":[
 ?  {"pic":"/tmp_uploads/30f08d52c551ecb447277eae232304b8"}
 ?  ],
 ?"attrs":[
 ?  {
 ? ? ?"attr_id":15,
 ? ? ?"attr_value":"ddd"
 ?  },
 ?  {
 ? ? ?"attr_id":15,
 ? ? ?"attr_value":"eee"
 ?  }
 ?  ]
}
<el-form-item label="商品分类" prop="goods_cat">
<el-cascader
:options="catelist"
v-model="addForm.goods_cat"
:props="{
expandTrigger: 'hover',
...cateProps,
}"
@change="handleChange">
</el-cascader>
</el-form-item>
// 添加商品的表单数据对象
addForm: {
// 商品所属的分类数组
goods_cat: []
},
addFormRules: {
goods_cat: [
{ required: true, message: '请选择商品分类', trigger: 'blur' }
]
},
// 指定props
cateProps: {
label: 'cat_name',
value: 'cat_id',
children: 'children'
}
// 级联选择器选中项变化,会触发这个函数
handleChange () {
console.log(this.addForm.goods_cat)
}17.控制级联选择器的选择范围
只允许选择三级分类,不允许选择其他分类。
<el-cascader @change="handleChange"></el-cascader>
// 级联选择器选中项变化,会触发这个函数
handleChange () {
      console.log(this.addForm.goods_cat)
      if (this.addForm.goods_cat.length !== 3) {
        this.addForm.goods_cat = []
      }
}
18.阻止标签页的切换
如果上一个内容还没有填,是不能允许加入下一个内容的填写的。
| before-leave | 切换标签之前的钩子,若返回 false 或者返回 Promise 且被 reject,则阻止切换。 | Function(activeName, oldActiveName) | ― | ― |
activeName即将进入的标签页的名称;oldActiveName即将离开的标签页的名称。
<!-- tabs栏区域 -->
<el-tabs
          :tab-position="'left'"
          v-model="activeIndex"
          :before-leave="beforeTabLeave"
>

beforeTabLeave (activeName, oldActiveName) {
      // console.log('即将离开的标签页名字是:' + oldActiveName)
      // console.log('即将进入的标签页名字是:' + activeName)
      // // 只要return false 则会阻止标签页的切换
      // return false
      if (oldActiveName === '0' && this.addForm.goods_cat.length !== 3) {
        this.$message.error('请先选择商品分类!')
        return false
      }
}
19.获取商品参数面板数据
参数列表
-
请求路径:categories/:id/attributes
-
请求方法:get
-
请求参数
| 参数名 | 参数说明 | 备注 |
|---|---|---|
| :id | 分类 ID | 不能为空携带在url中 |
| sel | [only,many] | 不能为空,通过 only 或 many 来获取分类静态参数还是动态参数 |
-
响应参数
| 参数名 | 参数说明 | 备注 |
|---|---|---|
| attr_id | 分类参数 ID | |
| attr_name | 分类参数名称 | |
| cat_id | 分类参数所属分类 | |
| attr_sel | only:输入框(唯一) many:后台下拉列表/前台单选框 | |
| attr_write | manual:手工录入 list:从列表选择 | |
| attr_vals | 如果 attr_write:list,那么有值,该值以逗号分隔 |
-
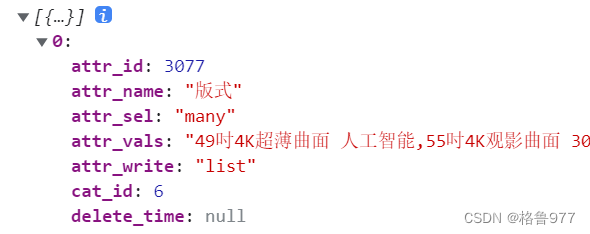
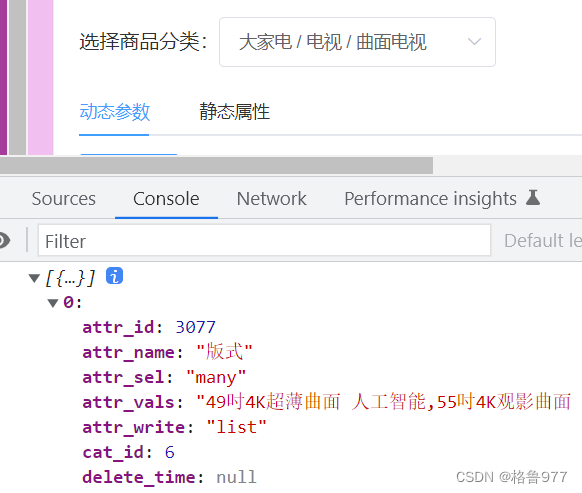
响应数据
{
 ?  "data": [
 ? ? ?  {
 ? ? ? ? ?  "attr_id": 1,
 ? ? ? ? ?  "attr_name": "cpu",
 ? ? ? ? ?  "cat_id": 22,
 ? ? ? ? ?  "attr_sel": "only",
 ? ? ? ? ?  "attr_write": "manual",
 ? ? ? ? ?  "attr_vals": "ffff"
 ? ? ?  }
 ?  ],
 ?  "meta": {
 ? ? ?  "msg": "获取成功",
 ? ? ?  "status": 200
 ?  }
}
点击第二个面板是(商品参数)才发起请求,点击事件进行绑定
| tab-click | tab 被选中时触发 | 被选中的标签 tab 实例 |
<!-- tabs栏区域 -->
<el-tabs
:tab-position="'left'"
v-model="activeIndex"
:before-leave="beforeTabLeave"
@tab-click="tabClicked"
>
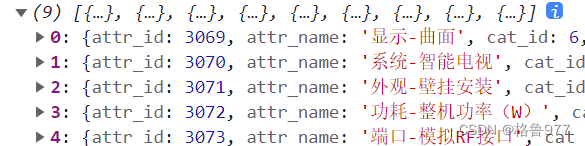
// 动态参数列表数据
manyTableData: []
async tabClicked () {
console.log(this.activeIndex)// 为1时,则是商品参数面板
// 证明访问的是动态参数面板
if (this.activeIndex === '1') {
// console.log('动态参数面板')
// 发送请求
const { data: res } = await this.$http.get(`categories/${this.cateId}/attributes`, { params: { sel: 'many' } })
// 将三级分类属性定义为一个计算属性来获取,比这个简单${this.addForm.goods_cat[2]}
if (res.meta.status !== 200) {
return this.$message.error('获取动态参数列表失败!')
}
console.log(res.data)
// 赋值
this.manyTableData = res.data
}
}
computed: {
cateId () {
// 证明包含了三级商品分类
if (this.addForm.goods_cat.length === 3) {
return this.addForm.goods_cat[2]
}
return null
}
}
-
为el-tabs绑定事件tab-click
-
在事件处理函数中,要判断激活面板的名称是否等于1;如果等于1,则表示进入了动态参数面板;可以发起请求,在发送请求期间,定义一个计算属性来简化代码。
20.渲染商品参数面板中的表单item项
checkbox-group元素能把多个 checkbox 管理为一组,只需要在 Group 中使用v-model绑定Array类型的变量即可。设置
border属性可以渲染为带有边框的多选框。
import { CheckboxGroup, Checkbox } from 'element-ui'

Vue.use(CheckboxGroup)
Vue.use(Checkbox)
<el-tab-pane label="商品参数" name="1">
<!-- 渲染表单的item项 -->
<el-form-item
:label="item.attr_name"
v-for="item in manyTableData"
:key="item.attr_id"
>
<!-- 复选框组 -->
<el-checkbox-group v-model="item.attr_vals">
<el-checkbox
:label="cb"
v-for="(cb, i) in item.attr_vals"
:key="i"
border
></el-checkbox>
</el-checkbox-group>
</el-form-item>
</el-tab-pane>
async tabClicked () {
if (res.meta.status !== 200) {
console.log(res.data)
// attr_vals从字符串转变成了数组
res.data.forEach(item => {
item.attr_vals = item.attr_vals.length === 0 ? [] : item.attr_vals.split(' ')
})
// 赋值
this.manyTableData = res.data
}
}https://element.eleme.cn/2.5/#/duo-xuan-kuang-zu
21.美化复选框
每一个框都有不一样的左边距有和右边距,先通过设置统一左右边距。
.el-checkbox {
  margin: 0 5px 0 0 !important;
}
22.商品属性面板对应功能
// 静态属性列表数据
onlyTableData: []

async tabClicked () {
 else if (this.activeIndex === '2') {
        // 静态属性面板
        const { data: res } = await this.$http.get(`categories/${this.cateId}/attributes`, { params: { sel: 'only' } })
        if (res.meta.status !== 200) {
          return this.$message.error('获取静态属性失败!')
        }
        console.log(res.data)
        this.onlyTableData = res.data
}
23.通过循环形式,将获取到的商品静态属性列表渲染成表单item项
<el-tab-pane label="商品属性" name="2">
    <el-form-item
              :label="item.attr_name"
              v-for="item in onlyTableData"
              :key="item.attr_id"
    >
       <el-input v-model="item.attr_vals"> </el-input>
    </el-form-item>
</el-tab-pane>
24.图片上传功能
图片上传
-
请求路径:upload
-
请求方法:post
-
请求参数
| 参数名 | 参数说明 | 备注 |
|---|---|---|
| file | 上传文件 |
-
响应数据
{
 ?  "data": {
 ? ? ?  "tmp_path": "tmp_uploads/ccfc5179a914e94506bcbb7377e8985f.png",
 ? ? ?  "url": "http://127.0.0.1:8888tmp_uploads/ccfc5179a914e94506bcbb7377e8985f.png"
 ?  },
 ?  "meta": {
 ? ? ?  "msg": "上传成功",
 ? ? ?  "status": 200
 ?  }
}
不应该写相对路径,而应该写完整路径。在main.js中有配置请求根路径。
| action | 必选参数,上传的地址 | string | ― | ― |
| on-preview | 点击文件列表中已上传的文件时的钩子 | function(file) | ― | ― |
| on-remove | 文件列表移除文件时的钩子 | function(file, fileList) | ― | ― |
| list-type | 文件列表的类型 | string | text/picture/picture-card | text |
<el-tab-pane label="商品图片" name="3">
     <!-- action:图片要上传到的后台API地址 -->
      <el-upload
              :action="uploadURL"
              :on-preview="handlePreview"
              :on-remove="handleRemove"
              list-type="picture"
      >
           <el-button size="small" type="primary">点击上传</el-button>
      </el-upload>
</el-tab-pane>
// 上传图片的URL地址
uploadURL: 'http://127.0.0.1:8888/api/private/v1/upload'
//后台地址拼接上upload地址

// 处理图片预览效果
handlePreview () {},
// 单击叉号时就会执行这个事件
// 处理移除图片的操作
handleRemove () {}
import { Upload } from 'element-ui'
Vue.use(Upload)https://element.eleme.cn/2.5/#/tu-pian-lie-biao-suo-lue-tu
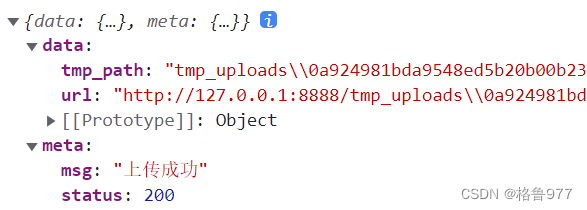
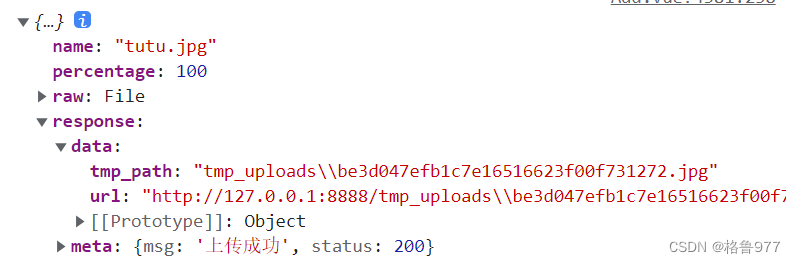
问题:使用network监听网络请求,点击上传按钮选择图片,点击Preview发现,图片并没有真正的上传上去
因为这里提示是无效token,需要提供token值,虽然main.js已经配置token了,但是这里并没有通过axios发起ajax请求,而是他自己el-upload封装的ajax请求。需要使用headers手动绑定请求头。
| headers | 设置上传的请求头部 | object | ― | ― |

 <el-upload :headers="headerObj">

// 图片上传组件的headers请求头对象
headerObj: {
      Authorization: window.sessionStorage.getItem('token')
}
在上传每一张图片都,都手动上传了headers请求头,在请求头中就包含了请求属性Authorization,它的值就是token值。
25.处理图片上传成功之后的操作
这张图片的相关信息还需要添加到表单中才算成功。
添加商品
-
请求路径:goods
-
请求方法:post
-
请求参数
| 参数名 | 参数说明 | 备注 |
|---|---|---|
| pics | 上传的图片临时路径(对象) | 可以为空 |
-
请求数据
{
 ?"pics":[
 ?  {"pic":"/tmp_uploads/30f08d52c551ecb447277eae232304b8"}
 ?  ]
}
?temp_path:这张图片的临时存放路径;把上传成功后的temp_path,以对象的形式添加到pics的数组中。

| on-success | 文件上传成功时的钩子 | function(response, file, fileList) | ― | ― |
- response:服务器返回的数据
- file:文件的信息
- fileList:当前上传组件的文件列表
<el-upload
:action="uploadURL"
:on-preview="handlePreview"
:on-remove="handleRemove"
list-type="picture"
:headers="headerObj"
:on-success="handleSuccess"
>
addForm: {
// 图片的数组
pics: []
}
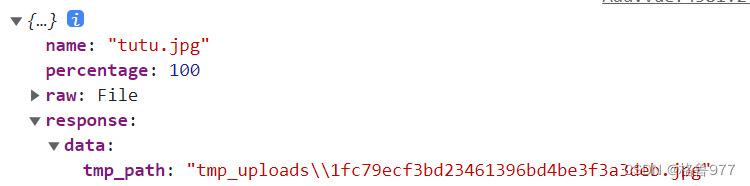
// 监听图片上传成功的事件
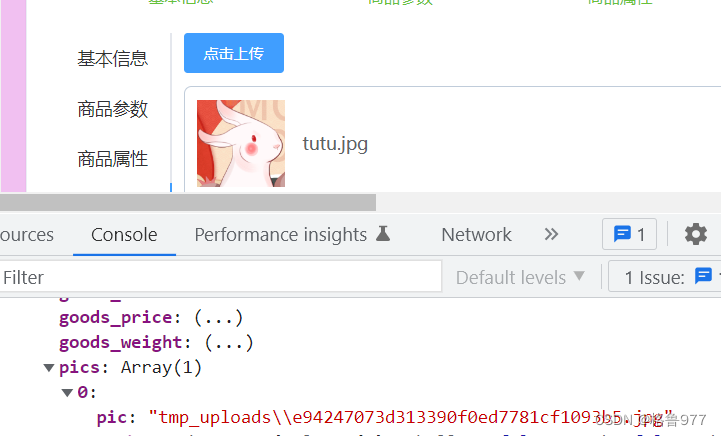
handleSuccess (response) {
console.log(response)
// 1.拼接得到应该图片信息对象
const picInfo = {
pic: response.data.tmp_path
}
// 2.将图片信息对象,push到pics数组中
this.addForm.pics.push(picInfo)
// 查看push结果
console.log(this.addForm)
}
pics里面的pic就是临时存放的图片路径
?
26.图片的移除操作
只要触发了移除操作,就会触发on-remove事件。
| on-remove | 文件列表移除文件时的钩子 | function(file, fileList) | ― |
file:将要移除的图片
这个tmp_path就是将要移除的图片路径
根据这个图片路径,从pics数组中查到那一项的索引值,根据索引值调用splice移除掉即可
// 单击叉号时就会执行这个事件
// 处理移除图片的操作
handleRemove (file) {
      console.log(file)
      // 1.获取将要删除的图片的临时路径
      const filePath = file.response.data.tmp_path
      // 2.从pics数组中,找到这个图片对应的索引值
      const i = this.addForm.pics.findIndex(x => x.pic === filePath)
      // 3.调用数组的splice方法,把图片信息对象,从pics数组中移除
      this.addForm.pics.splice(i, 1)
      console.log(this.addForm)
},
27.实现图片的预览效果
在点击图片名称时,会放大图片进行查看。
url:是完整路径,可以直接搜得到图片的。
- ?先监听el-upload的on-preview事件
- 在预览的处理函数中接收到了预览的图片信息
- 在图片信息中得到图片的完整路径
- 在页面上放图片的预览窗口
- 为预览窗口图片动态绑定图片地址
- 最后把图片显示出来
触发on-preview事件时,把图片展示出来。
| on-preview | 点击文件列表中已上传的文件时的钩子 | function(file) | ― | ― |
<!-- 图片预览 -->
<el-dialog title="图片预览" :visible.sync="previewVisible" width="50%">
      <img :src="previewPath" alt="" class="previewImg"/>
</el-dialog>

// 触发预览事件时,为它赋值
previewPath: ''
// false隐藏对话框
previewVisible: false
// 处理图片预览效果
handlePreview (file) {
      console.log(file)
      this.previewPath = file.response.data.url
      this.previewVisible = true
},
28.商品内容面板中渲染富文本编辑器
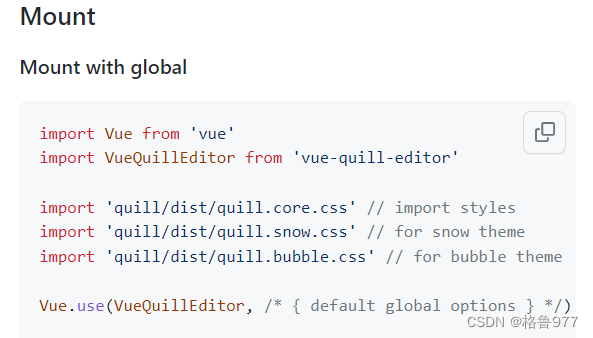
?https://github.com/surmon-china/vue-quill-editor#readme
main.js
// 2.require styles 导入富文本编辑器对应的样式
import 'quill/dist/quill.core.css'
import 'quill/dist/quill.snow.css'
import 'quill/dist/quill.bubble.css'
// 1.导入富文本编辑器
import  VueQuillEditor  from 'vue-quill-editor'

// 全局注册
// 3.将富文本编辑器,注册为全局可用的组件
Vue.use(VueQuillEditor)
global.css?
.ql-editor {
  min-height: 300px;
}
addForm: {
// 商品的详情描述
goods_introduce: ''
},
<el-tab-pane label="商品内容" name="4">
<!-- 富文本编辑器组件 -->
<quill-editor v-model="addForm.goods_introduce"></quill-editor>
<!-- 添加商品的按钮 -->
<el-button type="primary" class="btnAdd" @click="add">添加商品</el-button>
</el-tab-pane>?