ЧАбд
ЭђЮяЛЅСЊЕФЮяСЊЭјЪБДњЕФвбОРДСй,bleРЖбРПЊЗЂдкЦфжаАчбнзХОйжиШєЧсЕФНЧЩЋЁЃзюНќИеКУЯавЛЕу,ГщЪБМфЪсРэЯТетПщЕФжЊЪЖЕуЁЃ
ЩцМАbleРЖбРЭЈбЖЕФПЭЛЇЖЫ(ПЊЦєЁЂЩЈУшЁЂСЌНгЁЂЗЂЫЭКЭНгЪеЪ§ОнЁЂЗжАќНтАќ)КЭЗўЮёЖЫ(ГѕЪМЛЏЙуВЅЪ§ОнЁЂПЊЪМЙуВЅЁЂХфжУServicesЁЂServerЛиЕїВйзї)ећИіЛЗНквдМАвЛаЉГЃМћЕФЮЪЬтМДВШЙ§ЕФвЛаЉПгЁЃ
БШШч
1ЁЂдкAndroidВЛЭЌАцБОЛђВЛЭЌЪжЛњЕФЪЪХфЮЪЬт,ЩЈУшВЛЕНРЖбРЩшБИ
2ЁЂШчКЮБмУтbleРЖбРСЌНгГіЯж133ДэЮѓ?
3ЁЂЕЅДЮаДЕФЪ§ОнДѓаЁга20зжНкЯожЦ,ШчКЮЗЂЫЭГЄЪ§Он
РЖбРгаДЋЭГ(ОЕф)РЖбРКЭЕЭЙІКФРЖбРBLE(Bluetooth Low Energy)жЎЗж,СНепЕФПЊЗЂЕФAPIВЛвЛбљ,БОЮФжїНВBleРЖбРПЊЗЂ,ДЋЭГРЖбРВЛеЙПЊ,гаашвЊЕФПЩвдздааСЫНтЁЃ
ЯрЖдДЋЭГРЖбР,BLEЕЭЙІКФРЖбР,жївЊЬиЕуЪЧПьЫйЫбЫї,ПьЫйСЌНг,ГЌЕЭЙІКФБЃГжСЌНгКЭЪ§ОнДЋЪфЁЃ
DemoаЇЙћеЙЪО
ПЭЛЇЖЫ
ЗўЮёЖЫ
API
Android4.3(API Level 18)ПЊЪМв§ШыBLEЕФКЫаФЙІФмВЂЬсЙЉСЫЯргІЕФ APIЁЃгІгУГЬађЭЈЙ§етаЉ API ЩЈУшРЖбРЩшБИЁЂВщбЏ servicesЁЂЖСаДЩшБИЕФ characteristics(ЪєадЬиеї)ЕШВйзїЁЃ
BLEРЖбРавщЪЧGATTавщ, BLEЯрЙиРрВЛЖр, ШЋЖМЮЛгкandroid.bluetoothАќКЭandroid.bluetooth.leАќЕФМИИіРр:
android.bluetooth.
.BluetoothGattService АќКЌЖрИіCharacteristic(ЪєадЬиеїжЕ), КЌгаЮЈвЛЕФUUIDзїЮЊБъЪЖ
.BluetoothGattCharacteristic АќКЌЕЅИіжЕКЭЖрИіDescriptor, КЌгаЮЈвЛЕФUUIDзїЮЊБъЪЖ
.BluetoothGattDescriptor ЖдCharacteristicНјааУшЪі, КЌгаЮЈвЛЕФUUIDзїЮЊБъЪЖ
.BluetoothGatt ПЭЛЇЖЫЯрЙи
.BluetoothGattCallback ПЭЛЇЖЫСЌНгЛиЕї
.BluetoothGattServer ЗўЮёЖЫЯрЙи
.BluetoothGattServerCallback ЗўЮёЖЫСЌНгЛиЕї
android.bluetooth.le.
.AdvertiseCallback ЗўЮёЖЫЕФЙуВЅЛиЕї
.AdvertiseData ЗўЮёЖЫЕФЙуВЅЪ§Он
.AdvertiseSettings ЗўЮёЖЫЕФЙуВЅЩшжУ
.BluetoothLeAdvertiser ЗўЮёЖЫЕФЙуВЅ
.BluetoothLeScanner ПЭЛЇЖЫЩЈУшЯрЙи(Android5.0аТді)
.ScanCallback ПЭЛЇЖЫЩЈУшЛиЕї
.ScanFilter ПЭЛЇЖЫЩЈУшЙ§ТЫ
.ScanRecord ПЭЛЇЖЫЩЈУшНсЙћЕФЙуВЅЪ§Он
.ScanResult ПЭЛЇЖЫЩЈУшНсЙћ
.ScanSettings ПЭЛЇЖЫЩЈУшЩшжУ
BLEЩшБИЗжЮЊСНжжЩшБИ: ПЭЛЇЖЫ(вВНажїЛњ/жааФЩшБИ/Central), ЗўЮёЖЫ(вВНаДгЛњ/ЭтЮЇЩшБИ/peripheral)
ПЭЛЇЖЫЕФКЫаФРрЪЧ BluetoothGatt
ЗўЮёЖЫЕФКЫаФРрЪЧ BluetoothGattServer КЭ BluetoothLeAdvertiser
BLEЪ§ОнЕФКЫаФРрЪЧ BluetoothGattCharacteristic КЭ BluetoothGattDescriptor
ЯТУцЯъЯИНВНтЯТПЭЛЇЖЫКЭЗўЮёЖЫЕФПЊЗЂВНжшСїГЬ
вЛЁЂBLEПЭЛЇЖЫПЊЗЂСїГЬ
1ЁЂЩъЧыШЈЯо
АВзПЪжЛњЩцМАРЖбРШЈЯоЮЪЬт,РЖбРПЊЗЂашвЊдкAndroidManifest.xmlЮФМўжаЬэМгШЈЯоЩљУї:
<!-- РЖбРШЈЯо -->
<uses-permission android:name="android.permission.BLUETOOTH" />
<uses-permission android:name="android.permission.BLUETOOTH_ADMIN" />
ЮЊЪЪХфАВзП6.0вдМАвдЩЯАцБОашвЊЬэМгвЛИіФЃК§ЖЈЮЛЕФШЈЯо
<uses-permission android:name="android.permission.ACCESS_COARSE_LOCATION" />
ЪжЛњШЈЯоЙмРэжадЪаэДЫШЈЯо,ЗёдђЛсГіЯжЮоЗЈЫбЫїЕНЩшБИЕФЧщПі;
BLEШЈЯодіМгСЫBELжЇГжМьВщ
(1).дкmanifestжаЬэМгШЈЯо
<!-- true БэЪОЪжЛњБиаыжЇГжBLE,ЗёдђЮоЗЈАВзА!
етРяЩшЮЊfalse, дЫааКѓдкActivityжаМьВщ-->
<uses-feature
android:name="android.hardware.bluetooth_le"
android:required="false" />
(2).дкActivityжаЩшжУРЖбР
// МьВщЪЧЗёжЇГжBLEРЖбР
if (!getPackageManager().hasSystemFeature(PackageManager.FEATURE_BLUETOOTH_LE)) {
Util.toast(this, "БОЛњВЛжЇГжЕЭЙІКФРЖбР!");
finish();
return;
}
2ЁЂДђПЊРЖбР
дкЫбЫїЩшБИжЎЧАашвЊбЏЮЪДђПЊЪжЛњРЖбР:
//ЛёШЁЯЕЭГРЖбРЪЪХфЦїЙмРэРр
private BluetoothAdapter mBluetoothAdapter = BluetoothAdapter.getDefaultAdapter();
// бЏЮЪДђПЊРЖбР
if (mBluetoothAdapter != null && !mBluetoothAdapter.isEnabled()) {
Intent enableBtIntent = new Intent(BluetoothAdapter.ACTION_REQUEST_ENABLE);
startActivityForResult(enableBtIntent, 1);
}
// ЩъЧыДђПЊРЖбРЧыЧѓЕФЛиЕї
@Override
protected void onActivityResult(int requestCode, int resultCode, Intent data) {
// TODO Auto-generated method stub
super.onActivityResult(requestCode, resultCode, data);
if (requestCode == 1) {
if (resultCode == RESULT_OK) {
Toast.makeText(this, "РЖбРвбОПЊЦє", Toast.LENGTH_SHORT).show();
} else if (resultCode == RESULT_CANCELED) {
Toast.makeText(this, "УЛгаРЖбРШЈЯо", Toast.LENGTH_SHORT).show();
finish();
}
}
}
3ЁЂЫбЫїЩшБИ
зЂвт: BLEЩшБИЕижЗЪЧЖЏЬЌБфЛЏ(УПИєвЛЖЮЪБМфЖМЛсБфЛЏ),ЖјОЕфРЖбРЩшБИЪЧГіГЇОЭЙЬЖЈВЛБфСЫ!
BluetoothAdapter bluetoothAdapter = BluetoothAdapter.getDefaultAdapter();
// ЯТУцЪЙгУAndroid5.0аТдіЕФЩЈУшAPI,ЩЈУшЗЕЛиЕФНсЙћИќгбКУ,БШШчBLEЙуВЅЪ§ОнвдЧАЪЧbyte[] scanRecord,ЖјаТAPIАяЮвУЧНтЮіГЩScanRecordРр\
final BluetoothLeScanner bluetoothLeScanner = bluetoothAdapter.getBluetoothLeScanner();
bluetoothLeScanner.startScan(mScanCallback);
mHandler.postDelayed(new Runnable() {
@Override
public void run() {
bluetoothLeScanner.stopScan(mScanCallback); //ЭЃжЙЩЈУш
isScanning = false;
}
}, 3000);
// ЩЈУшНсЙћCallback
private final ScanCallback mScanCallback = new ScanCallback() {
@Override
public void onScanResult(int callbackType, ScanResult result) {ЁЂ
BluetoothDevice dev = result.getDevice() ЛёШЁBLEЩшБИаХЯЂ
// result.getScanRecord() ЛёШЁBLEЙуВЅЪ§Он
}
};
// ОЩAPIЪЧBluetoothAdapter.startLeScan(LeScanCallback callback)ЗНЪНЩЈУшBLEРЖбРЩшБИ,ШчЯТ:
mBluetoothAdapter.startLeScan(callback);
private LeScanCallback callback = new LeScanCallback() {
@Override
public void onLeScan(BluetoothDevice device, int arg1, byte[] arg2) {
//deviceЮЊЩЈУшЕНЕФBLEЩшБИ
if(device.getName() == "ФПБъЩшБИУћГЦ"){
//ЛёШЁФПБъЩшБИ
targetDevice = device;
}
}
};
4ЁЂСЌНгЩшБИ
ЭЈЙ§ЩЈУшBLEЩшБИ,ИљОнЩшБИУћГЦЧјЗжГіФПБъЩшБИtargetDevice,ЯТвЛВНЪЕЯжгыФПБъЩшБИЕФСЌНг,дкСЌНгЩшБИжЎЧАвЊЭЃжЙЫбЫїРЖбР;ЭЃжЙЫбЫївЛАуашвЊвЛЖЈЕФЪБМфРДЭъГЩ,зюКУЕїгУЭЃжЙЫбЫїКЏЪ§жЎКѓМгвд100msЕФбгЪБ,БЃжЄЯЕЭГФмЙЛЭъШЋЭЃжЙЫбЫїРЖбРЩшБИЁЃЭЃжЙЫбЫїжЎКѓЦєЖЏСЌНгЙ§ГЬ;
BLEРЖбРЕФСЌНгЗНЗЈЯрЖдМђЕЅжЛашЕїгУconnectGattЗНЗЈ;
public BluetoothGatt connectGatt (Context context, boolean autoConnect, BluetoothGattCallback callback);
ВЮЪ§ЫЕУї
- ЗЕЛижЕ BluetoothGatt: BLEРЖбРСЌНгЙмРэРр,жївЊИКд№гыЩшБИНјааЭЈаХ;
- boolean autoConnect:НЈвщжУЮЊfalse,ФмЙЛЬсЩ§СЌНгЫйЖШ;
- BluetoothGattCallback callback СЌНгЛиЕї,живЊВЮЪ§,BLEЭЈаХЕФКЫаФВПЗж;
5ЁЂЩшБИЭЈаХ
гыЩшБИНЈСЂСЌНгжЎКѓгыЩшБИЭЈаХ,ећИіЭЈаХЙ§ГЬЖМЪЧдкBluetoothGattCallbackЕФвьВНЛиЕїКЏЪ§жаЭъГЩ;
BluetoothGattCallbackжажївЊЛиЕїКЏЪ§ШчЯТ:
private BluetoothGattCallback gattCallback = new BluetoothGattCallback() {
@Override
public void onConnectionStateChange(BluetoothGatt gatt, int status,int newState) {
//СЌНгзДЬЌИФБфЕФCallback
}
@Override
public void onServicesDiscovered(BluetoothGatt gatt, int status) {
//ЗўЮёЗЂЯжГЩЙІЕФCallback
}
@Override
public void onCharacteristicWrite(BluetoothGatt gatt,BluetoothGattCharacteristic characteristic, int status) {
//аДШыCharacteristic
}
@Override
public void onCharacteristicRead(BluetoothGatt gatt, BluetoothGattCharacteristic characteristic, int status) {
//ЖСШЁCharacteristic
}
@Override
public void onCharacteristicChanged(BluetoothGatt gatt,BluetoothGattCharacteristic characteristic) {
//ЭЈжЊCharacteristic
}
@Override
public void onDescriptorWrite(BluetoothGatt gatt, BluetoothGattDescriptor descriptor, int status) {
//аДШыDescriptor
}
@Override
public void onDescriptorRead(BluetoothGatt gatt, BluetoothGattDescriptor descriptor, int status) {
//ЖСШЁDescriptor
}
};
ЩЯЪіМИИіЛиЕїКЏЪ§ЪЧBLEПЊЗЂжаВЛПЩШБЩйЕФ;
6ЁЂЕШД§ЩшБИСЌНгГЩЙІ
ЕБЕїгУtargetdDevice.connectGatt(context, false, gattCallback)КѓЯЕЭГЛсжїЖЏЗЂЦ№гыBLEРЖбРЩшБИЕФСЌНг,ШєГЩЙІСЌНгЕНЩшБИНЋЛиЕїonConnectionStateChangeЗНЗЈ,ЦфДІРэЙ§ГЬШчЯТ:
@Override
public void onConnectionStateChange(BluetoothGatt gatt, int status,int newState) {
if (newState == BluetoothGatt.STATE_CONNECTED) {
Log.e(TAG, "ЩшБИСЌНгЩЯ ПЊЪМЩЈУшЗўЮё");
// СЌНгГЩЙІКѓ,ПЊЪМЩЈУшЗўЮё
mBluetoothGatt.discoverServices();
}
if (newState == BluetoothGatt.STATE_DISCONNECTED) {
// СЌНгЖЯПЊ
/*СЌНгЖЯПЊКѓЕФЯргІДІРэ*/
}
};
ХаЖЯnewState == BluetoothGatt.STATE_CONNECTEDБэУїДЫЪБвбОГЩЙІСЌНгЕНЩшБИ;
7ЁЂПЊЦєЩЈУшЗўЮё
mBluetoothGatt.discoverServices();
ЩЈУшBLEЩшБИЗўЮёЪЧАВзПЯЕЭГжаЙигкBLEРЖбРПЊЗЂЕФживЊвЛВН,вЛАудкЩшБИСЌНгГЩЙІКѓЕїгУ,ЩЈУшЕНЩшБИЗўЮёКѓЛиЕїonServicesDiscovered()КЏЪ§,КЏЪ§даЭШчЯТ:
@Override
public void onServicesDiscovered(BluetoothGatt gatt, int status) {
private List<BluetoothGattService> servicesList;
//ЛёШЁЗўЮёСаБэ
servicesList = mBluetoothGatt.getServices();
}
- BLEРЖбРавщЯТЪ§ОнЕФЭЈаХЗНЪНВЩгУBluetoothGattServiceЁЂBluetoothGattCharacteristicКЭBluetoothGattDescriptorШ§ИіжївЊЕФРрЪЕЯжЭЈаХ;
- BluetoothGattService МђГЦЗўЮё,ЪЧЙЙГЩBLEЩшБИавщеЛЕФзщГЩЕЅЮЛ,вЛИіРЖбРЩшБИавщеЛвЛАугЩвЛИіЛђепЖрИіBluetoothGattServiceзщГЩ;
- BluetoothGattCharacteristic МђГЦЬиеї,вЛИіЗўЮёАќКЌвЛИіЛђепЖрИіЬиеї,ЬиеїзїЮЊЪ§ОнЕФЛљБОЕЅдЊ;
- вЛИіBluetoothGattCharacteristicЬиеїАќКЌвЛИіЪ§ОнжЕКЭИНМгЕФЙигкЬиеїЕФУшЪі;
- BluetoothGattDescriptor:гУгкУшЪіЬиеїЕФРр,ЦфЭЌбљАќКЌвЛИіvalueжЕ;
8ЁЂЛёШЁИКд№ЭЈаХЕФBluetoothGattCharacteristic
BLEРЖбРПЊЗЂжївЊгаИКд№ЭЈаХЕФBluetoothGattServiceЭъГЩЕФЁЃЕБЧвГЦЮЊЭЈаХЗўЮёЁЃЭЈаХЗўЮёЭЈЙ§гВМўЙЄГЬЪІЬсЙЉЕФUUIDЛёШЁЁЃЛёШЁЗНЪНШчЯТ:
- BluetoothGattService service = mBluetoothGatt.getService(UUID.fromString(ЁАРЖбРФЃПщЬсЙЉЕФИКд№ЭЈаХUUIDзжЗћДЎЁБ));
- ЭЈаХЗўЮёжаАќКЌИКд№ЖСаДЕФBluetoothGattCharacteristic,ЧвЗжБ№ГЦЮЊnotifyCharacteristicКЭwriteCharacteristicЁЃЦфжаnotifyCharacteristicИКд№ПЊЦєМрЬ§,вВОЭЪЧЦєЖЏЪеЪ§ОнЕФЭЈЕР,writeCharacteristicИКд№аДШыЪ§Он;
ОпЬхВйзїЗНЪНШчЯТ:
BluetoothGattService service = mBluetoothGatt.getService(UUID.fromString("РЖбРФЃПщЬсЙЉЕФИКд№ЭЈаХЗўЮёUUIDзжЗћДЎ"));
// Р§ШчаЮЪНШч:49535343-fe7d-4ae5-8fa9-9fafd205e455
notifyCharacteristic = service.getCharacteristic(UUID.fromString("notify uuid"));
writeCharacteristic = service.getCharacteristic(UUID.fromString("write uuid"));
9ЁЂПЊЦєМрЬ§
ПЊЦєМрЬ§,МДНЈСЂгыЩшБИЕФЭЈаХЕФЪзЗЂЪ§ОнЭЈЕР,BLEПЊЗЂжажЛгаЕБПЭЛЇЖЫГЩЙІПЊЦєМрЬ§КѓВХФмгыЗўЮёЖЫЪеЗЂЪ§ОнЁЃПЊЦєМрЬ§ЕФЗНЪНШчЯТ:
mBluetoothGatt.setCharacteristicNotification(notifyCharacteristic, true)
BluetoothGattDescriptor descriptor = characteristic .getDescriptor(UUID.fromString("00002902-0000-1000-8000-00805f9b34fb"));
descriptor.setValue(BluetoothGattDescriptor.ENABLE_NOTIFICATION_VALUE);
//ШєПЊЦєМрЬ§ГЩЙІдђЛсЛиЕїBluetoothGattCallbackжаЕФonDescriptorWrite()ЗНЗЈ,ДІРэЗНЪНШчЯТ:
@Override
public void onDescriptorWrite(BluetoothGatt gatt, BluetoothGattDescriptor descriptor, int status) {
if (status == BluetoothGatt.GATT_SUCCESS) {
//ПЊЦєМрЬ§ГЩЙІ,ПЩвдЯђЩшБИаДШыУќСюСЫ
Log.e(TAG, "ПЊЦєМрЬ§ГЩЙІ");
}
};
10ЁЂаДШыЪ§Он
BLEЕЅДЮаДЕФЪ§ОнСПДѓаЁЪЧгаЯожЦЕФ,ЭЈГЃЪЧ20зжНк,ПЩвдГЂЪдЭЈЙ§requestMTUдіДѓ,ЕЋВЛБЃжЄФмГЩЙІЁЃЗжАќаДЪЧвЛжжНтОіЗНАИ,ашвЊЖЈвхЗжАќавщ,МйЩшУПИіАќДѓаЁ20зжНк,ЗжСНжжАќ,Ъ§ОнАќКЭЗЧЪ§ОнАќЁЃЖдгкЪ§ОнАќ,ЭЗСНИізжНкБэЪОАќЕФађКХ,ЪЃЯТЕФЖМЬюГфЪ§ОнЁЃЖдгкЗЧЪ§ОнАќ,жївЊЪЧЗЂЫЭвЛаЉПижЦаХЯЂЁЃ
МрЬ§ГЩЙІКѓЭЈЙ§Яђ writeCharacteristicаДШыЪ§ОнЪЕЯжгыЗўЮёЖЫЕФЭЈаХЁЃаДШыЗНЪНШчЯТ:
//valueЮЊПЭЛЇЖЫЯђЗўЮёЖЫЗЂЫЭЕФжИСю
writeCharacteristic.setValue(value);
mBluetoothGatt.writeCharacteristic(writeCharacteristic)
Цфжа:valueвЛАуЮЊHexИёЪНжИСю,ЦфФкШнгЩЩшБИЭЈаХЕФРЖбРЭЈаХавщЙцЖЈ;
11ЁЂНгЪеЪ§Он
ШєаДШыжИСюГЩЙІдђЛиЕїBluetoothGattCallbackжаЕФonCharacteristicWrite()ЗНЗЈ,ЫЕУїНЋЪ§ОнвбОЗЂЫЭИјЯТЮЛЛњ;
@Override
public void onCharacteristicWrite(BluetoothGatt gatt,
BluetoothGattCharacteristic characteristic, int status) {
if (status == BluetoothGatt.GATT_SUCCESS) {
Log.e(TAG, "ЗЂЫЭГЩЙІ");
}
}
ШєЗЂЫЭЕФЪ§ОнЗћКЯЭЈаХавщ,дђЗўЮёЖЫЛсЯђПЭЛЇЖЫЛиИДЯргІЕФЪ§ОнЁЃЗЂЫЭЕФЪ§ОнЭЈЙ§ЛиЕїonCharacteristicChanged()ЗНЗЈЛёШЁ,ЦфДІРэЗНЪНШчЯТ:
@Override
public void onCharacteristicChanged(BluetoothGatt gatt, BluetoothGattCharacteristic characteristic) {
// valueЮЊЩшБИЗЂЫЭЕФЪ§Он,ИљОнЪ§ОнавщНјааНтЮі
byte[] value = characteristic.getValue();
}
ЭЈЙ§ЯђЗўЮёЖЫЗЂЫЭжИСюЛёШЁЗўЮёЖЫЕФЛиИДЪ§Он,МДПЩЭъГЩгыЩшБИЕФЭЈаХЙ§ГЬ;
12ЁЂЖЯПЊСЌНг
ЕБгыЩшБИЭъГЩЭЈаХжЎКѓжЎКѓвЛЖЈвЊЖЯПЊгыЩшБИЕФСЌНгЁЃЕїгУвдЯТЗНЗЈЖЯПЊгыЩшБИЕФСЌНг:
mBluetoothGatt.disconnect();
mBluetoothGatt.close();
ЖўЁЂBLEЗўЮёЖЫПЊЗЂСїГЬ
1ЁЂЩшжУЙуВЅвдМАГѕЪМЛЏЙуВЅЪ§Он
//ЙуВЅЩшжУ(Биаы)
AdvertiseSettings settings = new AdvertiseSettings.Builder()
.setAdvertiseMode(AdvertiseSettings.ADVERTISE_MODE_LOW_LATENCY) //ЙуВЅФЃЪН: ЕЭЙІКФ,ЦНКт,ЕЭбгГй
.setTxPowerLevel(AdvertiseSettings.ADVERTISE_TX_POWER_HIGH) //ЗЂЩфЙІТЪМЖБ№: МЋЕЭ,ЕЭ,жа,Ип
.setTimeout(0)
.setConnectable(true) //ФмЗёСЌНг,ЙуВЅЗжЮЊПЩСЌНгЙуВЅКЭВЛПЩСЌНгЙуВЅ
.build();
//ЙуВЅЪ§Он(Биаы,ЙуВЅЦєЖЏОЭЛсЗЂЫЭ)
AdvertiseData advertiseData = new AdvertiseData.Builder()
.setIncludeDeviceName(true) //АќКЌРЖбРУћГЦ
.setIncludeTxPowerLevel(true) //АќКЌЗЂЩфЙІТЪМЖБ№
.addManufacturerData(1, new byte[]{23, 33}) //ЩшБИГЇЩЬЪ§Он,здЖЈвх
.build();
//ЩЈУшЯьгІЪ§Он(ПЩбЁ,ЕБПЭЛЇЖЫЩЈУшЪБВХЗЂЫЭ)
AdvertiseData scanResponse = new AdvertiseData.Builder()
.addManufacturerData(2, new byte[]{66, 66}) //ЩшБИГЇЩЬЪ§Он,здЖЈвх
.addServiceUuid(new ParcelUuid(UUID_SERVICE)) //ЗўЮёUUID
// .addServiceData(new ParcelUuid(UUID_SERVICE), new byte[]{2}) //ЗўЮёЪ§Он,здЖЈвх
.build();
2ЁЂПЊЪМЙуВЅ
BluetoothManager bluetoothManager = (BluetoothManager) getSystemService(Context.BLUETOOTH_SERVICE);
//BluetoothAdapter bluetoothAdapter = bluetoothManager.getAdapter();
BluetoothAdapter bluetoothAdapter = BluetoothAdapter.getDefaultAdapter();
// ============ЦєЖЏBLEРЖбРЙуВЅ(ЙуИц) ===============
mBluetoothLeAdvertiser = bluetoothAdapter.getBluetoothLeAdvertiser();
mBluetoothLeAdvertiser.startAdvertising(settings, advertiseData, scanResponse, mAdvertiseCallback);
// BLEЙуВЅCallback
private AdvertiseCallback mAdvertiseCallback = new AdvertiseCallback() {
@Override
public void onStartSuccess(AdvertiseSettings settingsInEffect) {
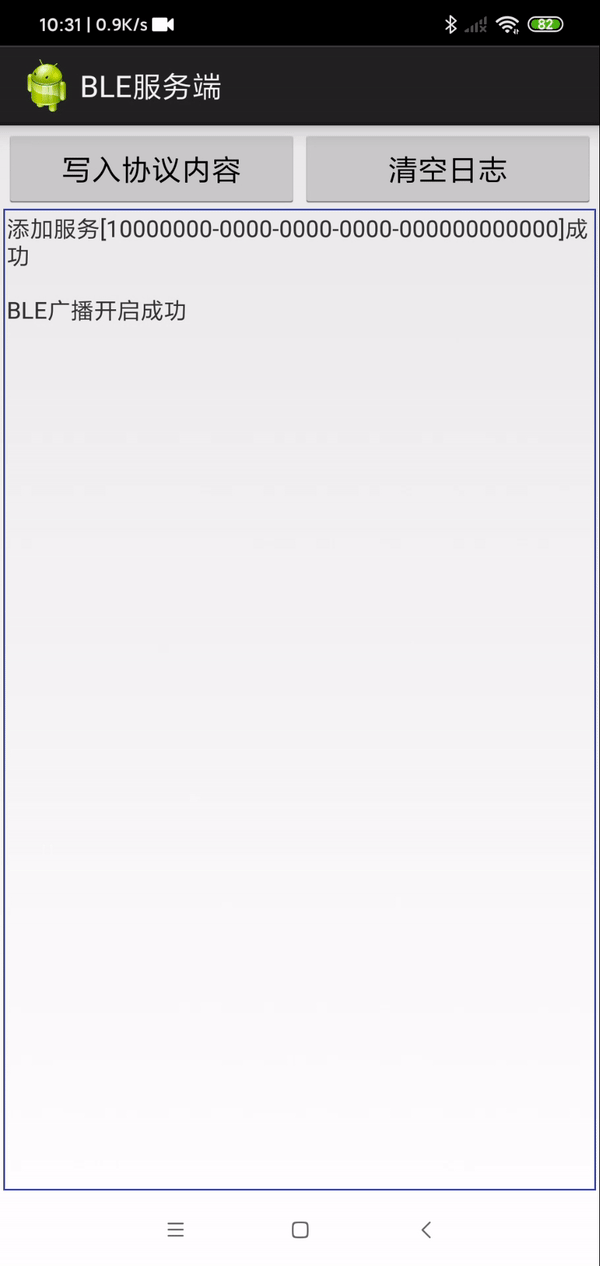
logTv("BLEЙуВЅПЊЦєГЩЙІ");
}
@Override
public void onStartFailure(int errorCode) {
logTv("BLEЙуВЅПЊЦєЪЇАм,ДэЮѓТы:" + errorCode);
}
};
3ЁЂХфжУServicesвдМАCharacteristic
// зЂвт:БиаывЊПЊЦєПЩСЌНгЕФBLEЙуВЅ,ЦфЫќЩшБИВХФмЗЂЯжВЂСЌНгBLEЗўЮёЖЫ!
// =============ЦєЖЏBLEРЖбРЗўЮёЖЫ======================================
BluetoothGattService service = new BluetoothGattService(UUID_SERVICE, BluetoothGattService.SERVICE_TYPE_PRIMARY);
//ЬэМгПЩЖС+ЭЈжЊcharacteristic
BluetoothGattCharacteristic characteristicRead = new BluetoothGattCharacteristic(UUID_CHAR_READ_NOTIFY,BluetoothGattCharacteristic.PROPERTY_READ | BluetoothGattCharacteristic.PROPERTY_NOTIFY, BluetoothGattCharacteristic.PERMISSION_READ);
characteristicRead.addDescriptor(new BluetoothGattDescriptor(UUID_DESC_NOTITY, BluetoothGattCharacteristic.PERMISSION_WRITE));
service.addCharacteristic(characteristicRead);
//ЬэМгПЩаДcharacteristic
BluetoothGattCharacteristic characteristicWrite = new BluetoothGattCharacteristic(UUID_CHAR_WRITE, BluetoothGattCharacteristic.PROPERTY_WRITE, BluetoothGattCharacteristic.PERMISSION_WRITE);
service.addCharacteristic(characteristicWrite);
if (bluetoothManager != null){
mBluetoothGattServer = bluetoothManager.openGattServer(this, mBluetoothGattServerCallback);
}
mBluetoothGattServer.addService(service);
4ЁЂServerЛиЕївдМАВйзї
/**
* ЗўЮёЪТМўЕФЛиЕї
*/
private BluetoothGattServerCallback mBluetoothGattServerCallback= new BluetoothGattServerCallback() {
/**
* 1.СЌНгзДЬЌЗЂЩњБфЛЏЪБ
*/
@Override
public void onConnectionStateChange(BluetoothDevice device, int status, int newState) {
Log.e(TAG, String.format("1.onConnectionStateChange:device name = %s, address = %s", device.getName(), device.getAddress()));
Log.e(TAG, String.format("1.onConnectionStateChange:status = %s, newState =%s ", status, newState));
}
@Override
public void onServiceAdded(int status, BluetoothGattService service) {
Log.e(TAG, String.format("onServiceAdded:status = %s", status));
}
@Override
public void onCharacteristicReadRequest(BluetoothDevice device, int requestId, int offset, BluetoothGattCharacteristic characteristic) {
Log.e(TAG, String.format("onCharacteristicReadRequest:device name = %s, address = %s", device.getName(), device.getAddress()));
Log.e(TAG, String.format("onCharacteristicReadRequest:requestId = %s, offset = %s", requestId, offset));
mGattServer.sendResponse(device, requestId, BluetoothGatt.GATT_SUCCESS, offset, characteristic.getValue());
}
/**
* 3. onCharacteristicWriteRequest,НгЪеОпЬхЕФзжНк
*/
@Override
public void onCharacteristicWriteRequest(BluetoothDevice device, int requestId, BluetoothGattCharacteristic characteristic, boolean preparedWrite, boolean responseNeeded, int offset, byte[] requestBytes) {
Log.e(TAG, String.format("3.onCharacteristicWriteRequest:device name = %s, address = %s", device.getName(), device.getAddress()));
Log.e(TAG, String.format("3.onCharacteristicWriteRequest:requestId = %s, preparedWrite=%s, responseNeeded=%s, offset=%s, value=%s", requestId, preparedWrite, responseNeeded, offset, requestBytes.toString()));
mGattServer.sendResponse(device, requestId, BluetoothGatt.GATT_SUCCESS, offset, requestBytes);
//4.ДІРэЯьгІФкШн
onResponseToClient(requestBytes, device, requestId, characteristic);
}
/**
* 2.УшЪіБЛаДШыЪБ,дкетРяжДаа bluetoothGattServer.sendResponse(device, requestId, BluetoothGatt.GATT_SUCCESS... Ъе,ДЅЗЂ onCharacteristicWriteRequest
*/
@Override
public void onDescriptorWriteRequest(BluetoothDevice device, int requestId, BluetoothGattDescriptor descriptor, boolean preparedWrite, boolean responseNeeded, int offset, byte[] value) {
Log.e(TAG, String.format("2.onDescriptorWriteRequest:device name = %s, address = %s", device.getName(), device.getAddress()));
Log.e(TAG, String.format("2.onDescriptorWriteRequest:requestId = %s, preparedWrite = %s, responseNeeded = %s, offset = %s, value = %s,", requestId, preparedWrite, responseNeeded, offset, value.toString()));
// now tell the connected device that this was all successfull
mGattServer.sendResponse(device, requestId, BluetoothGatt.GATT_SUCCESS, offset, value);
}
/**
* 5.ЬиеїБЛЖСШЁЁЃЕБЛиИДЯьгІГЩЙІКѓ,ПЭЛЇЖЫЛсЖСШЁШЛКѓДЅЗЂБОЗНЗЈ
*/
@Override
public void onDescriptorReadRequest(BluetoothDevice device, int requestId, int offset, BluetoothGattDescriptor descriptor) {
Log.e(TAG, String.format("onDescriptorReadRequest:device name = %s, address = %s", device.getName(), device.getAddress()));
Log.e(TAG, String.format("onDescriptorReadRequest:requestId = %s", requestId));
mGattServer.sendResponse(device, requestId, BluetoothGatt.GATT_SUCCESS, offset, null);
}
@Override
public void onNotificationSent(BluetoothDevice device, int status) {
super.onNotificationSent(device, status);
Log.e(TAG, String.format("5.onNotificationSent:device name = %s, address = %s", device.getName(), device.getAddress()));
Log.e(TAG, String.format("5.onNotificationSent:status = %s", status));
}
@Override
public void onMtuChanged(BluetoothDevice device, int mtu) {
super.onMtuChanged(device, mtu);
Log.e(TAG, String.format("onMtuChanged:mtu = %s", mtu));
}
@Override
public void onExecuteWrite(BluetoothDevice device, int requestId, boolean execute) {
super.onExecuteWrite(device, requestId, execute);
Log.e(TAG, String.format("onExecuteWrite:requestId = %s", requestId));
}
};
/**
* 4.ДІРэЯьгІФкШн
*
* @param reqeustBytes
* @param device
* @param requestId
* @param characteristic
*/
private void onResponseToClient(byte[] reqeustBytes, BluetoothDevice device, int requestId, BluetoothGattCharacteristic characteristic) {
Log.e(TAG, String.format("4.onResponseToClient:device name = %s, address = %s", device.getName(), device.getAddress()));
Log.e(TAG, String.format("4.onResponseToClient:requestId = %s", requestId));
Log.e(TAG, "4.ЪеЕН:");
String str = new String(reqeustBytes) + " hello>";
characteristicRead.setValue(str.getBytes());
mGattServer.notifyCharacteristicChanged(device, characteristicRead, false);
Log.i(TAG, "4.ЯьгІ:" + str);
MainActivity.handler.obtainMessage(MainActivity.DEVICE, new String(reqeustBytes)).sendToTarget();
}
Ш§ЁЂдДТыЯТди
дДТыЩЯДЋдкCSDNЩЯСЫ,гаашвЊЕФПЩвдНшМјЁЃ
=====> AndroidРЖбРBleЭЈбЖDemoЪОР§дДТыЈCЩЈУш,СЌНг,ЗЂЫЭКЭНгЪеЪ§Он,ЗжАќНтАќ
ЫФЁЂРЖбРВйзїЕФзЂвтЪТЯю
1ЁЂШчКЮБмУтbleРЖбРСЌНгГіЯж133ДэЮѓ?
- Android СЌНгЭтЮЇЩшБИЕФЪ§СПгаЯо,ЕБВЛашвЊСЌНгРЖбРЩшБИЕФЪБКђ,БиаыЕїгУ BluetoothGatt#close ЗНЗЈЪЭЗХзЪдД;
- РЖбР API СЌНгРЖбРЩшБИЕФГЌЪБЪБМфДѓИХдк 20s зѓгв,ОпЬхЪБМфПДЯЕЭГЪЕЯжЁЃгаЪБКђФГаЉЩшБИНјааРЖбРСЌНгЕФЪБМфЛсКмГЄ,ДѓИХЪЎЖрУыЁЃШчЙћздМКЪжЖЏЩшжУСЫСЌНгГЌЪБЪБМфдкФГаЉЩшБИЩЯПЩФмЛсЕМжТНгЯТРДМИДЮЕФСЌНгГЂЪдЖМЛсдк BluetoothGattCallback#onConnectionStateChange ЗЕЛи state == 133;
- ФмЗёБмУтandroidЩшБИгыbleЩшБИСЌНг/ЖЯПЊЪБЩЯБЈЕФ133етРрДэЮѓ?
1ЁЂдкСЌНгЪЇАмЛђепЖЯПЊСЌНгжЎКѓ,ЕїгУ close ВЂЫЂаТЛКДц
2ЁЂОЁСПВЛвЊдкstartLeScanЕФЪБКђГЂЪдСЌНг,ЯШstopLeScanКѓдйШЅСЌ
3ЁЂЖдЭЌвЛЩшБИЖЯПЊКѓдйДЮСЌНг(СЌНгЪЇАмжиСЌ),ФФХТЕїгУЭъclose,ашвЊЕШД§вЛЖЮЪБМф(400КСУыЪдСЫ1ДЮ,НсЙћВЛ аа;1000КСУыдђдйУЛГіЯжЙ§ЮЪЬт)КѓдйШЅconnectGatt
4ЁЂПЩвддкСЌНгЧАЖМstartLeScanвЛЯТ,ГЩЙІТЪвЊИпвЛЕу
2ЁЂЕЅДЮаДЕФЪ§ОнДѓаЁга20зжНкЯожЦ,ШчКЮЗЂЫЭГЄЪ§Он?
BLEЕЅДЮаДЕФЪ§ОнСПДѓаЁЪЧгаЯожЦЕФ,ЭЈГЃЪЧ20зжНк,ПЩвдГЂЪдЭЈЙ§requestMTUдіДѓ,ЕЋВЛБЃжЄФмГЩЙІЁЃЗжАќаДЪЧвЛжжНтОіЗНАИ,ашвЊЖЈвхЗжАќавщ,МйЩшУПИіАќДѓаЁ20зжНк,ЗжСНжжАќ,Ъ§ОнАќКЭЗЧЪ§ОнАќЁЃЖдгкЪ§ОнАќ,ЭЗСНИізжНкБэЪОАќЕФађКХ,ЪЃЯТЕФЖМЬюГфЪ§ОнЁЃЖдгкЗЧЪ§ОнАќ,жївЊЪЧЗЂЫЭвЛаЉПижЦаХЯЂЁЃ
змЬхСїГЬШчЯТ:
1ЁЂЖЈвхЭЈбЖавщ,ШчЯТ(етРяжЛЪЧИіОйР§,ПЩвдИљОнЯюФПашЧѓРЉеЙ)
| ЯћЯЂКХ(1ИізжНк) | ЙІФм(1ИізжНк) | згЙІФм(1ИізжНк) | Ъ§ОнГЄЖШ(2ИізжНк) | Ъ§ОнФкШн(NИізжНк) | CRCаЃбщ(1ИізжНк) |
|---|---|---|---|---|---|
| 01 | 01 | 01 | 0000 | ЈC | 2D |
2ЁЂЗтзАЭЈгУЗЂЫЭЪ§ОнНгПк(В№Аќ)
ИУНгПкИљОнЛсЗЂЫЭЪ§ОнФкШнАДзюДѓзжНкЪ§В№Зж(вЛАу20зжНк)ЗХШыЖгСа,В№ЗжЭъКѓ,вРДЮДгЖгСаРяШЁГіЗЂЫЭ
3ЁЂЗтзАЭЈгУНгЪеЪ§ОнНгПк(зщАќ)
ИУНгПкИљОнДгНгЪеЕФЪ§ОнАДавщРяЕФЖЈвхНтЮіЪ§ОнГЄЖШХаЖСЪЧЗёЭъећАќ,ВЛЪЧЕФЛААбУПЬѕЯћЯЂРлМгЦ№РД
4ЁЂНтЮіЭъећЕФЪ§ОнАќ,НјаавЕЮёТпМДІРэ
5ЁЂавщЛЙПЩвдв§ШыМгУмНтУм,ашвЊзЂвтЕФбЁЫуЗЈВЮЪ§ЕФЪБКђ,МгУмКѓЕФГЄЖШзюКУИњдЪ§ОнГЄЖШвЛжТ,етбљВЛЛсгАЯьВ№АќзщАќ
3ЁЂдкAndroidВЛЭЌАцБОЛђВЛЭЌЕФЪжЛњЩЈУшВЛЕНРЖбРЩшБИ
вЛАуЖМЪЧAndroidАцБОЪЪХфвдМАВЛЭЌROMЛњаЭ(аЁУз/КьУзЁЂЛЊЮЊ/ШйвЋЕШ)(EMUIЁЂMIUIЁЂColorOSЕШ)ЕФШЈЯоЮЪЬт
4ЁЂЦфЫќ
- РЖбРЕФаДШыВйзї, ЖСШЁВйзїБиаыађСаЛЏНјаа. аДШыЪ§ОнКЭЖСШЁЪ§ОнЪЧВЛФмЭЌЪБНјааЕФ, ШчЙћЕїгУСЫаДШыЪ§ОнЕФЗНЗЈ, ТэЩЯЕїгУгжЕїгУаДШыЪ§ОнЛђепЖСШЁЪ§ОнЕФЗНЗЈ,ЕкЖўДЮЕїгУЕФЗНЗЈЛсСЂМДЗЕЛи false, ДњБэЕБЧАЮоЗЈНјааВйзї;
змНс
РЖбРПЊЗЂжагаКмЖрЮЪЬт,вЊОВЯТаФЗжЮіЮЪЬт,ПЯЖЈПЩвдНтОіЕФ,вЛЦ№МггЭ;