Shader入门-------屏幕后处理
前记:需求需要,快速学习--------------------mx
屏幕后处理:通常指在渲染完整个场景得到屏幕图像之后再对这个图像进行一系列操作,实现各种屏幕特效。
Unity中提供一个接口OnRenderImage函数。声明如下:OnRenderImage(RenderTexture src ,RenderTexture dest) Unity会把当前渲染得到的图像存储在第一个参数对应的源渲染纹理中,通过函数中一系列操作后,再把目标渲染纹理,即第二个参数对应的渲染纹理显示到屏幕上。在OnRenderImage函数中,我们通常是利用Graphics.Blit函数来完成对渲染纹理的处理。他有三种函数声明:
public static void Blit(Texture src ,RenderTexture dest);
public static void Blit(Texture src ,RenderTexture dest,Material mat ,int pass =-1);
public static void Blit(Texture src ,Material mat ,int pass =-1);
其中 ,参数src对应源纹理,这个参数通常是当前屏幕的渲染纹理或者是上一步处理后得到的渲染纹理。参数dest是目标渲染纹理,如果它的值为null就会直接将结果显示在屏幕上。参数mat是我们使用的材质,而src纹理会被传递给shader中命名为_MainTex的纹理属性。参数pass的默认值为-1,表示将会依次调用Shader内的所有pass,否则只会调用给定索引的pass
在Unity中实现屏幕后处理效果,过程通常如下:我们首先需要在摄像中添加一个用于屏幕后处理的脚本。在这个脚本中,我们会实现OnRenderImage函数来获取当前屏幕的渲染纹理。然后在调用Graphics.Blit函数使用特定的Unity Shader来对当前图像进行处理,再把返回的渲染纹理显示到屏幕上。对于一些复杂的屏幕特效,我们可能需要多次调用Graphics.Blit函数来对上一步的输出结果进行下一步处理。
我们先创建一个用于屏幕后处理效果的基类,在实现各种屏幕特效时,我们只需要继承自该基类,再实现派生类中不同的操作即可
基类
using System.Collections;
using System.Collections.Generic;
using UnityEngine;

/// <summary>
/// 后处理基类
/// </summary>
[ExecuteInEditMode]
[RequireComponent(typeof(Camera))]
public class PostEffectsBase : MonoBehaviour
{
    // Start is called before the first frame update
    protected void Start()
    {
        CheckResources();
    }

    // Update is called once per frame
    void Update()
    {

    }
    private void NotSupported()
    {
        enabled = false;
    }
    /// <summary>
    /// 用于提前检查各种资源和条件是否满足
    /// </summary>
    protected void CheckResources()
    {
        bool isSupported = CheckSupport();
        if(isSupported==false)
        {
            NotSupported();
        }
    }
    protected bool CheckSupport()
    {
        if(SystemInfo.supportsImageEffects==false||SystemInfo.supportsRenderTextures==false)
        {
            Debug.LogWarning("This platform does not support image effects or render textures .");
            return false;
        }
        return true;
    }
    protected Material CheckShaderAndCreateMaterial(Shader shader, Material material)
    {
        if(shader==null )
        {
            return null;
        }
        if (shader.isSupported && material && material.shader == shader)
            return material;
        if (!shader.isSupported)
            return null;
        else
        {
            material = new Material(shader);
            material.hideFlags = HideFlags.DontSave;

            if (material)
                return material;
            else
            {
                return null;
            }
        }
    }
}
调整屏幕亮度、饱和度、和对比度
后处理脚本
using System.Collections;
using System.Collections.Generic;
using UnityEngine;

public class BrightnessSaturationAndContrast : PostEffectsBase
{
    public Shader briSatConShader;
    private Material briSatConMaterial;
    public Material material
    {
        get
        {
            briSatConMaterial = CheckShaderAndCreateMaterial(briSatConShader, briSatConMaterial);
            return briSatConMaterial;
        }
    }
    [Range(0.0f, 3.0f)]
    public float brightness = 1.0f;
    [Range(0.0f, 3.0f)]
    public float saturation = 1.0f;
    [Range(0.0f, 3.0f)]
    public float contrast = 1.0f;
    private void OnRenderImage(RenderTexture source, RenderTexture destination)
    {
        if(material!=null)
        {
            material.SetFloat("_Brightness", brightness);
            material.SetFloat("_Saturation", saturation);
            material.SetFloat("_Contrast", contrast);
            Graphics.Blit(source, destination, material);
        }
        else
        {
            Graphics.Blit(source, destination);
        }
    }


}
shader
Shader "Custom/BrightSaturationAndContrast"
{
    Properties
    {

        _MainTex ("Base (RGB)", 2D) = "white" {}
        _Brightness("Brightness",Float) = 1
        _Saturation("Saturation",Float) = 1
        _Contrast("Contrast",Float) = 1
    }
        SubShader
        {
           Pass
            {
            //实际上是在场景中绘制了一个与屏幕同宽同高的四边形面片,为了防止它对其他物体产生影响,我们需要要设置相关的渲染状态。在这里我们关闭了深度写入
            //是为了防止它“挡住”在其后面被渲染的物体
            ZTest Always Cull Off ZWrite Off
            CGPROGRAM
            #pragma vertex vert
            #pragma fragment frag

            #include "UnityCG.cginc"

            sampler2D _MainTex;
            half _Brightness;
            half _Saturation;
            half _Contrast;

            struct v2f
            {
                float4 pos :SV_POSITION;
                half2 uv :TEXCOORD0;
            };
            //appdata_img结构体作为顶点着色器的输入,它只包含了图像处理时必须的顶点坐标和纹理坐标等变量
            v2f vert(appdata_img v)
            {
                v2f o;
                o.pos = UnityObjectToClipPos(v.vertex);
                o.uv = v.texcoord;
                return o;
            }
            fixed4 frag(v2f i) :SV_Target
            {
                //亮度:_Brightness属性来调整亮度。亮度的调整非常简单,原颜色*亮度系数_Brightness
                //饱和度:亮度值通过每个颜色分量乘以一个特定的系数相加得到,使用该亮度创建一个饱和度为0的颜色值,并使用_Saturation在和上一步得到的颜色值进行插值,得到饱和度颜色
                //对比度:创建一个对比度为0的颜色值(各分量为0.5),再使用_Contrast属性在和上一步得到的颜色进行插值
                fixed4 renderTex = tex2D(_MainTex,i.uv);
                fixed3 finalColor = renderTex.rgb * _Brightness;
                fixed luminance = 0.2125 * renderTex.r + 0.7154 * renderTex.g + 0.0721 * renderTex.b;
                fixed3 luminanceColor = fixed3(luminance, luminance, luminance);
                finalColor = lerp(luminanceColor, finalColor, _Saturation);
                fixed3 avgColor = fixed3(0.5, 0.5, 0.5);
                finalColor = lerp(avgColor,finalColor, _Contrast);
                return fixed4(finalColor, renderTex.a);
            }
            ENDCG
        }
    }
    Fallback Off
}
边缘检测
基础知识:
卷积:卷积操作就是使用一个卷积核对一张图像中的每个像素进行乘积并求和,得到的结果放在中心
边缘检测―常用的三种边缘检测算子
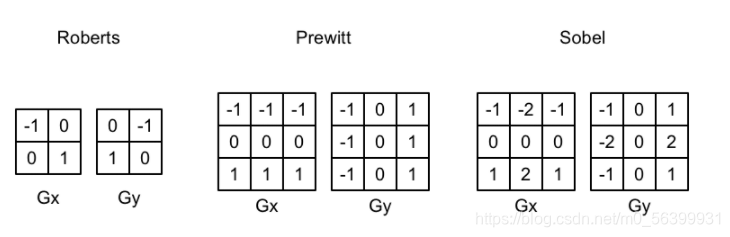
(每个边缘算子都包含了两个方向的卷积核,分别用于检测水平方向和竖直方向上的边缘信息。在进行边缘检测时,我们需要对每个像素分别进行一次卷积计算,得到两个方向上的梯度值Gx和Gy,而整体的梯度可以按下面的公式计算得到:
但是考虑性能我们会使用绝对值来代替开根号的操作
得到梯度G之后,梯度值越大越有可能是边缘)
后处理脚本
using System.Collections;
using System.Collections.Generic;
using UnityEngine;

public class EdgeDetection : PostEffectsBase
{
    public Shader edgeDetectionShader;
    private Material edgeDetectionMaterial;
    public Material material
    {
        get
        {
            edgeDetectionMaterial = CheckShaderAndCreateMaterial(edgeDetectionShader, edgeDetectionMaterial);
            return edgeDetectionMaterial;
        }
    }
    [Range(0.0f, 3.0f)]
    public float edgesOnly = 1.0f;
    public Color edgeColor = Color.black;
    public Color bgColor = Color.white;
    private void OnRenderImage(RenderTexture source, RenderTexture destination)
    {
        if(material!=null)
        {
            material.SetFloat("_EdgeOnly", edgesOnly);
            material.SetColor("_EdgeColor", edgeColor);
            material.SetColor("_BackgroundColor", bgColor);
            Graphics.Blit(source, destination, material);
        }
        else
        {
            Graphics.Blit(source, destination);
        }
    }

}
shader
Shader "Custom/EdgeDetection"
{
    Properties{
        _MainTex("Base (RGB)", 2D) = "white" {}
        _EdgeOnly("Edge Only", Float) = 1.0
        _EdgeColor("Edge Color", Color) = (0, 0, 0, 1)
        _BackgroundColor("Background Color", Color) = (1, 1, 1, 1)
    }
        SubShader{
            Pass {
                ZTest Always Cull Off ZWrite Off

                CGPROGRAM

                #include "UnityCG.cginc"

                #pragma vertex vert
                #pragma fragment fragSobel

                sampler2D _MainTex;
        //xxx_TexelSize 是Unity为我们提供访问xxx纹理对应的每个纹素的大小。
        //例如一张512×512的纹理,该值大小为0.001953(即1/512)。由于卷积需要对相邻区域内的纹理
        //进行采样,因此我们需要它来计算相邻区域的纹理坐标
        uniform half4 _MainTex_TexelSize;
        fixed _EdgeOnly;
        fixed4 _EdgeColor;
        fixed4 _BackgroundColor;

        struct v2f {
            float4 pos : SV_POSITION;
            half2 uv[9] : TEXCOORD0;
        };

        v2f vert(appdata_img v) {
            v2f o;
            o.pos = UnityObjectToClipPos(v.vertex);

            half2 uv = v.texcoord;
            //我们在v2f结构体中定义了一个维数为9的纹理数组,对应了使用Sobel算子采样时需要的9个
            //邻域纹理坐标。通过把计算采样纹理坐标的代码从片元着色器转移到顶点着色器中,可以减少
            //运算,提供性能。由于从顶点着色器到片元着色器的插值是线性的,因此这样的转移不会影响
            //纹理坐标的计算结果。
            o.uv[0] = uv + _MainTex_TexelSize.xy * half2(-1, -1);
            o.uv[1] = uv + _MainTex_TexelSize.xy * half2(0, -1);
            o.uv[2] = uv + _MainTex_TexelSize.xy * half2(1, -1);
            o.uv[3] = uv + _MainTex_TexelSize.xy * half2(-1, 0);
            o.uv[4] = uv + _MainTex_TexelSize.xy * half2(0, 0);
            o.uv[5] = uv + _MainTex_TexelSize.xy * half2(1, 0);
            o.uv[6] = uv + _MainTex_TexelSize.xy * half2(-1, 1);
            o.uv[7] = uv + _MainTex_TexelSize.xy * half2(0, 1);
            o.uv[8] = uv + _MainTex_TexelSize.xy * half2(1, 1);

            return o;
        }

        fixed luminance(fixed4 color)
        {
            return  0.2125 * color.r + 0.7154 * color.g + 0.0721 * color.b;
        }

        //利用Sobel算子计算梯度值
        half Sobel(v2f i)
        {
            //水平方向卷积核
            const half Gx[9] = {-1,  0,  1,
                                -2,  0,  2,
                                -1,  0,  1};
            //竖直方向卷积核
            const half Gy[9] = {-1, -2, -1,
                                 0,  0,  0,
                                 1,  2,  1};

            half texColor;
            half edgeX = 0;
            half edgeY = 0;
            for (int it = 0; it < 9; it++)
            {
                //采样,得到亮度值
                texColor = luminance(tex2D(_MainTex, i.uv[it]));
                //水平方向上梯度
                edgeX += texColor * Gx[it];
                //竖直方向上梯度
                edgeY += texColor * Gy[it];
            }
            //edge 越小,表面该位置越可能是一个边缘点。
            half edge = 1 - abs(edgeX) - abs(edgeY);

            return edge;
        }

        fixed4 fragSobel(v2f i) : SV_Target
        {
            half edge = Sobel(i);

            fixed4 withEdgeColor = lerp(_EdgeColor, tex2D(_MainTex, i.uv[4]), edge);
            fixed4 onlyEdgeColor = lerp(_EdgeColor, _BackgroundColor, edge);
            return lerp(withEdgeColor, onlyEdgeColor, _EdgeOnly);
        }

        ENDCG
    }
    }
    FallBack Off
}
高斯模糊
前置知识:
模糊的实现方法:
均值模糊:使用卷积操作,卷积核中各个元素值都相等,且相加等于1,得到的像素值是其领域内各个像素值的平均值
中值模糊:选择领域内对所有像素排序后的中值替换掉原颜色。
高斯模糊:高斯模糊同样使用了卷积操作,使用的卷积核名为高斯核。高斯核是一个正方形大小的滤波核,其中每个元素的计算基于高斯方程: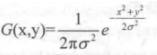
其中σ 是标准方差(一般取值为1),x和y分别对应了当前位置到卷积核中心的整数距离。要构建一个高斯核,我们只需要计算高斯核中各个位置对应的高斯值。为了保证滤波后的图像不会变暗,我们需要对高斯核中的权重进行归一化,即让每个权重除以所有权重的和,这样可以保证所有权重的和为1。因此,高斯函数中e的前面的系数实际不会对结果又任何影响。下图显示了一个标准方差为1的5×5大小的高斯核。
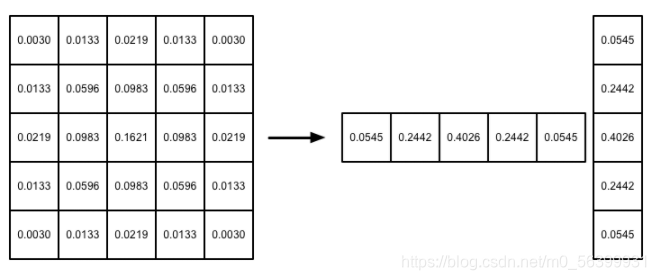
高斯方程很好地模拟了邻域每个像素对当前处理像素的影响程度――距离越近,影响越大。高斯核的维数越高,模糊程度越大。使用一个N×N的高斯核对图像进行卷积滤波,就需要N×N×W×H(W和H分别是图像的宽和高)次纹理采样。当N的大小不断增加时,采样次数会变得非常巨大。幸运的是,我们可以把这个二维高斯函数拆分成两个一维函数。也就是说,我们可以使用两个一维的高斯核先后对图像进行滤波,它们得到的结果和直接使用二维高斯核是一样的,但采样次数只需要2×N×W×H.我们可以进一步观察到,两个一维高斯核中包含了很多重复的权重,对比一个大小为5的一维高斯核,我们实际只需要记录3个权重(前三个)即可。
我们将会使用上述5×5的高斯核对原图像进行高斯模糊。我们将先后调用两个Pass,第一个Pass将会使用竖直方向的一维高斯核对图像进行滤波,第二个Pass再使用水平方向的一维高斯核对图像进行滤波,得到最终的目标图像。在实现中,我们还将利用图像缩放来进一步提高性能,并通过调整高斯滤波的应用次数来控制模糊程度。
后处理脚本
using System.Collections;
using System.Collections.Generic;
using UnityEngine;

public class GaussianBlur : PostEffectsBase
{
    public Shader gaussianBlurShader;
    private Material gaussianBlurMaterial;
    public Material material
    {
        get
        {
            gaussianBlurMaterial = CheckShaderAndCreateMaterial(gaussianBlurShader, gaussianBlurMaterial);
            return gaussianBlurMaterial;
        }
    }
    [Range(0, 3)]
    public int iterations = 3;
    [Range(0.2f, 3.0f)]
    public float blurSpread =0.6f;
    [Range(1, 8)]
    public int downSample = 2;
    private void OnRenderImage(RenderTexture source, RenderTexture destination)
    {
        if (material != null)
        {
            int rtW = source.width/downSample;
            int rtH = source.height / downSample;
            RenderTexture buffer0 = RenderTexture.GetTemporary(rtW, rtH, 0);
            buffer0.filterMode = FilterMode.Bilinear;
            Graphics.Blit(source, buffer0);
            for(int i=0;i<iterations;i++)
            {
                material.SetFloat("_BlurSize", 1.0f + i * blurSpread);
                RenderTexture buffer1=RenderTexture.GetTemporary(rtW, rtH, 0);
                Graphics.Blit(buffer0, buffer1, material, 0);
                RenderTexture.ReleaseTemporary(buffer0);
                buffer0 = buffer1;
                buffer1=RenderTexture.GetTemporary(rtW, rtH, 0);
                Graphics.Blit(buffer0, buffer1, material, 1);
                RenderTexture.ReleaseTemporary(buffer0);
                buffer0 = buffer1;
            }
            Graphics.Blit(buffer0, destination);
            RenderTexture.ReleaseTemporary(buffer0);
        }
        else
        {
            Graphics.Blit(source, destination);
        }
    }

}
shader
Shader "Custom/GaussianBlur"
{
    Properties{
       _MainTex("Base (RGB)", 2D) = "white" {}
       _BlurSize("Blur Size", Float) = 1.0
    }
        SubShader{
           //在SubShader 块中利用CGINCLUDE 和 ENDCG 来定义一系列代码
           //这些代码不需要包含在Pass语义块中,在使用时,我们只需要在Pass中指定需要
           //使用的顶点着色器和片元着色器函数名即可。
           //使用CGINCLUDE 来管理代码 可以避免我们编写两个完全一样的frag函数
           //这里相当于只是定义 执行还是在下边的Pass中
           CGINCLUDE
           #include "UnityCG.cginc"

           sampler2D _MainTex;
           half4 _MainTex_TexelSize;
           float _BlurSize;

           struct v2f {
               float4 pos : SV_POSITION;
               half2 uv[5]: TEXCOORD0;
           };

           v2f vertBlurVertical(appdata_img v) {
               v2f o;
               o.pos = UnityObjectToClipPos(v.vertex);

               half2 uv = v.texcoord;

               o.uv[0] = uv;
               o.uv[1] = uv + float2(0.0, _MainTex_TexelSize.y * 1.0) * _BlurSize;
               o.uv[2] = uv - float2(0.0, _MainTex_TexelSize.y * 1.0) * _BlurSize;
               o.uv[3] = uv + float2(0.0, _MainTex_TexelSize.y * 2.0) * _BlurSize;
               o.uv[4] = uv - float2(0.0, _MainTex_TexelSize.y * 2.0) * _BlurSize;

               return o;
           }

           v2f vertBlurHorizontal(appdata_img v) {
               v2f o;
               o.pos = UnityObjectToClipPos(v.vertex);

               half2 uv = v.texcoord;

               o.uv[0] = uv;
               o.uv[1] = uv + float2(_MainTex_TexelSize.x * 1.0, 0.0) * _BlurSize;
               o.uv[2] = uv - float2(_MainTex_TexelSize.x * 1.0, 0.0) * _BlurSize;
               o.uv[3] = uv + float2(_MainTex_TexelSize.x * 2.0, 0.0) * _BlurSize;
               o.uv[4] = uv - float2(_MainTex_TexelSize.x * 2.0, 0.0) * _BlurSize;

               return o;
           }

           fixed4 fragBlur(v2f i) : SV_Target {
               float weight[3] = {0.4026, 0.2442, 0.0545};

               fixed3 sum = tex2D(_MainTex, i.uv[0]).rgb * weight[0];

               for (int it = 1; it < 3; it++) {
                   sum += tex2D(_MainTex, i.uv[it * 2 - 1]).rgb * weight[it];
                   sum += tex2D(_MainTex, i.uv[it * 2]).rgb * weight[it];
               }

               return fixed4(sum, 1.0);
           }

           ENDCG

           ZTest Always Cull Off ZWrite Off

           Pass {
               NAME "GAUSSIAN_BLUR_VERTICAL"

               CGPROGRAM

               #pragma vertex vertBlurVertical
               #pragma fragment fragBlur

               ENDCG
           }

           Pass {
               NAME "GAUSSIAN_BLUR_HORIZONTAL"

               CGPROGRAM

               #pragma vertex vertBlurHorizontal
               #pragma fragment fragBlur

               ENDCG
           }
       }

        FallBack Off
}
Bloom效果
前置知识:
Bloom的实现原理非常简单:我们首先根据一个阈值提取出图像中较亮的区域,把他们存储在一张渲染纹理中,再利用高斯模糊对这张渲染纹理进行模糊处理,模拟光线扩散的效果,最后再将其和原图像进行混合,得到最终效果。
后处理脚本
using System.Collections;
using System.Collections.Generic;
using UnityEngine;

public class Bloom : PostEffectsBase
{
    public Shader bloomShader;
    private Material bloomMaterial;
    public Material material
    {
        get
        {
            bloomMaterial = CheckShaderAndCreateMaterial(bloomShader, bloomMaterial);
            return bloomMaterial;
        }
    }
    [Range(0,4)]
    public int iterations = 3;
    [Range(0.2f, 3.0f)]
    public float blurSpread = 0.6f;
    [Range(1, 8)]
    public int downSample = 2;
    //阈值大小控制,我们开启HDR让像素的范围可以超过1
    [Range(0.0f,4.0f)]
    public float luminanceThreshold = 0.6f;
    private void OnRenderImage(RenderTexture source, RenderTexture destination)
    {
        if (material != null)
        {
            material.SetFloat("_LuminanceTheshold", luminanceThreshold);
            int rtW = source.width / downSample;
            int rtH = source.height / downSample;
            RenderTexture buffer0 = RenderTexture.GetTemporary(rtW, rtH, 0);
            buffer0.filterMode = FilterMode.Bilinear;
            Graphics.Blit(source, buffer0,material,0);
            for (int i = 0; i < iterations; i++)
            {
                material.SetFloat("_BlurSize", 1.0f + i * blurSpread);
                RenderTexture buffer1 = RenderTexture.GetTemporary(rtW, rtH, 0);
                Graphics.Blit(buffer0, buffer1, material, 1);
                RenderTexture.ReleaseTemporary(buffer0);
                buffer0 = buffer1;
                buffer1 = RenderTexture.GetTemporary(rtW, rtH, 0);
                Graphics.Blit(buffer0, buffer1, material, 2);
                RenderTexture.ReleaseTemporary(buffer0);
                buffer0 = buffer1;
            }

            material.SetTexture("_Bloom",buffer0);
            Graphics.Blit(buffer0, destination,material,3);
            RenderTexture.ReleaseTemporary(buffer0);
        }
        else
        {
            Graphics.Blit(source, destination);
        }
    }

}
shader
(这个shader有点问题,可能是路径的关系)
Shader "Custom/Bloom"
{
    Properties{
         _MainTex("Base (RGB)", 2D) = "white" {}
        //高斯模糊后的较亮的区域
        _Bloom("Bloom (RGB)", 2D) = "black" {}
        //用于提取较亮区域使用的阈值
        _LuminanceThreshold("Luminance Threshold", Float) = 0.5
        //控制不同迭代之间高斯模糊的模糊区域范围
        _BlurSize("Blur Size", Float) = 1.0
    }
        SubShader{
            CGINCLUDE

            #include "UnityCG.cginc"

            sampler2D _MainTex;
            half4 _MainTex_TexelSize;
            sampler2D _Bloom;
            float _LuminanceThreshold;
            float _BlurSize;

            struct v2f {
                float4 pos : SV_POSITION;
                half2 uv : TEXCOORD0;
            };

            v2f vertExtractBright(appdata_img v) {
                v2f o;

                o.pos = UnityObjectToClipPos(v.vertex);

                o.uv = v.texcoord;

                return o;
            }

            fixed luminance(fixed4 color) {
                return  0.2125 * color.r + 0.7154 * color.g + 0.0721 * color.b;
            }

            fixed4 fragExtractBright(v2f i) : SV_Target {
                fixed4 c = tex2D(_MainTex, i.uv);
                fixed val = clamp(luminance(c) - _LuminanceThreshold, 0.0, 1.0);

                return c * val;
            }

            struct v2fBloom {
                float4 pos : SV_POSITION;
                half4 uv : TEXCOORD0;
            };

            v2fBloom vertBloom(appdata_img v) {
                v2fBloom o;

                o.pos = UnityObjectToClipPos(v.vertex);
                o.uv.xy = v.texcoord;
                o.uv.zw = v.texcoord;

                #if UNITY_UV_STARTS_AT_TOP
                if (_MainTex_TexelSize.y < 0.0)
                    o.uv.w = 1.0 - o.uv.w;
                #endif

                return o;
            }

            fixed4 fragBloom(v2fBloom i) : SV_Target {
                return tex2D(_MainTex, i.uv.xy) + tex2D(_Bloom, i.uv.zw);
            }

            ENDCG

            ZTest Always Cull Off ZWrite Off

            Pass {
                CGPROGRAM
                #pragma vertex vertExtractBright
                #pragma fragment fragExtractBright

                ENDCG
            }
            //这两个高斯模糊的Pass注意对应你自己的路径 最后的名字改为大写
           UsePass "GaussianBlur/GAUSSIAN_BLUR_VERTICAL"

           UsePass "GaussianBlur/GAUSSIAN_BLUR_HORIZONTAL"

           Pass {
               CGPROGRAM
               #pragma vertex vertBloom
               #pragma fragment fragBloom

               ENDCG
           }
    }
        FallBack Off

}
运动模糊
前置知识:
运动模糊的实现方式:
①利用一块累计缓存来混合多张连续的图像,当物体快速移动产生多张图像后,我们取他们之间的平均值作为最后的运动模糊图像,缺点:性能消耗大
②创建和使用速度缓存,在缓存汇总存储各个像素当前的运动速度,然后利用该值来决定模糊的方向和大小
后处理脚本
using System.Collections;
using System.Collections.Generic;
using UnityEngine;

public class MotionBlur : PostEffectsBase
{
    public Shader motionBlurShader;
    private Material motionBlurMaterial;
    public Material material
    {
        get
        {
            motionBlurMaterial = CheckShaderAndCreateMaterial(motionBlurShader, motionBlurMaterial);
            return motionBlurMaterial;
        }
    }
    [Range(0.0f, 0.9f)]
    public float blurAmount = 0.5f;
    //blurAmount 的值越大, 运动拖尾的效果就越明显, 为了防止拖尾效果完全替代当前帧的渲染
    //结果, 我们把它的值截取在 0.0-0.9 范围内。
    private RenderTexture accumulationTexture;
    void OnDisable()
    {
        DestroyImmediate(accumulationTexture);
    }
    private void OnRenderImage(RenderTexture source, RenderTexture destination)
    {
        if (material != null)
        {
            if(accumulationTexture==null || accumulationTexture.width!=source.width||accumulationTexture.height!=source.height)
            {
                DestroyImmediate(accumulationTexture);
                accumulationTexture = new RenderTexture(source.width, source.height, 0);
                accumulationTexture.hideFlags = HideFlags.HideAndDontSave;
                Graphics.Blit(source, accumulationTexture);
            }
            accumulationTexture.MarkRestoreExpected();
            material.SetFloat("_BlurAmount", 1.0f - blurAmount);
            Graphics.Blit(source, accumulationTexture, material);
            Graphics.Blit(accumulationTexture, destination);
        }
        else
        {
            Graphics.Blit(source, destination);
        }
    }

}
shader
Shader "Custom/MotionBlur"
{
    Properties
    {
        _MainTex ("Base (RGB)", 2D) = "white" {}
        //混合系数
        _BlurAmount("Blur Amount", Float) = 1.0
    }
    SubShader
    {
        CGINCLUDE

        #include "UnityCG.cginc"

        sampler2D _MainTex;
        fixed _BlurAmount;

        struct v2f
        {
            float4 pos : SV_POSITION;
            half2 uv : TEXCOORD0;
        };

        v2f vert(appdata_img v)
        {
            v2f o;
            o.pos = UnityObjectToClipPos(v.vertex);
            o.uv = v.texcoord;
            return o;
        }
        fixed4 fragRGB(v2f i) : SV_Target
        {
            return fixed4(tex2D(_MainTex, i.uv).rgb, _BlurAmount);
        }

        half4 fragA(v2f i) : SV_Target
        {
                return tex2D(_MainTex, i.uv);
        }

        ENDCG

        ZTest Always Cull Off ZWrite Off

        Pass
        {
            Blend SrcAlpha OneMinusSrcAlpha
            ColorMask RGB

            CGPROGRAM

            #pragma vertex vert
            #pragma fragment fragRGB

            ENDCG
        }

        Pass
        {
            Blend One Zero
            ColorMask A

            CGPROGRAM

            #pragma vertex vert
            #pragma fragment fragA

            ENDCG
        }
    }
    FallBack Off
}
---------------------------博主:mx